Turn off water, remove the handle, replace worn parts, and reassemble.
If you want to know how to fix bathtub faucet problems the right way, you are in the right place. I have repaired hundreds of tub valves, from slow drips to full rebuilds. This guide shows you how to fix bathtub faucet issues fast, safe, and with pro tips that avoid repeat leaks. Read on for clear steps, photos-in-mind detail, and expert shortcuts you will use for years.
:max_bytes(150000):strip_icc()/how-to-replace-a-bathtub-faucet-5210836-10-6825223c1e75442187d5ab09690510d4.jpg)
What causes a bathtub faucet to leak or fail
Most leaks come from worn internal parts. Age, hard water, and heat cause these parts to break down.
Common culprits include:
- Cartridge wear causes drips or poor mixing in single-handle valves.
- Compression washers and seats wear out in two-handle valves.
- O-rings dry out around the stem or spout and cause leaks at handles.
- Diverter failure sends water to both tub and shower at once.
- Corroded valve seats pit and keep washers from sealing.
Signs to watch:
- Drip from the spout with handles off.
- Water pooling under the handle trim.
- Handle hard to turn or makes grinding sounds.
- Poor hot and cold mix or sudden temp shifts.
- Water still comes from the spout when shower is on.
Knowing the cause makes it easy to plan how to fix bathtub faucet problems without guesswork.
Tools and parts you need
You do not need a shop full of tools. A small kit is enough.
Have these on hand:
- Screwdrivers, both flat and Phillips
- Allen wrench set for set screws
- Adjustable wrench and a deep socket set
- Needle-nose pliers and channel locks
- Utility knife and putty knife
- Plumber’s grease and Teflon tape
- White vinegar and an old toothbrush
- Towels, a small bucket, and a rag to plug the drain
- Replacement parts such as cartridge, washers, seats, O-rings, diverter, or spout
Tip from the field: bring old parts to the store. Match by brand and model when you can. This saves a return trip and helps when you learn how to fix bathtub faucet parts the first time.

Safety, shutoff, and prep
Start safe. Water off means risk off.
Do this first:
- Turn off the water. Use local shutoffs if your tub has them. If not, close the main.
- Open the lowest faucet in the home. This drains pressure.
- Plug the tub drain with a rag. Small screws love to vanish.
- Lay a towel in the tub to protect the surface.
- Take a photo before you remove parts. It helps with reassembly.
These small steps set you up to win as you learn how to fix bathtub faucet leaks with less stress.
Identify your faucet type
The fix depends on the valve style. Check the handle setup and trim.
Main types:
- Single-handle cartridge mixer. One lever, common in modern homes.
- Two-handle compression. Separate hot and cold, uses rubber washers and seats.
- Two-handle ceramic disc. Quarter turn, smooth action, long life.
- Ball-type single handle. Older style with springs and seats.
- Tub and shower with diverter. Pull-up knob on the spout or a third handle.
Once you know your type, you can choose the right path for how to fix bathtub faucet problems with the least work.
Step-by-step: how to fix bathtub faucet leak by type
Below are clear steps for each common faucet type. Go slow. Keep parts in order. A muffin tin makes a great tray.
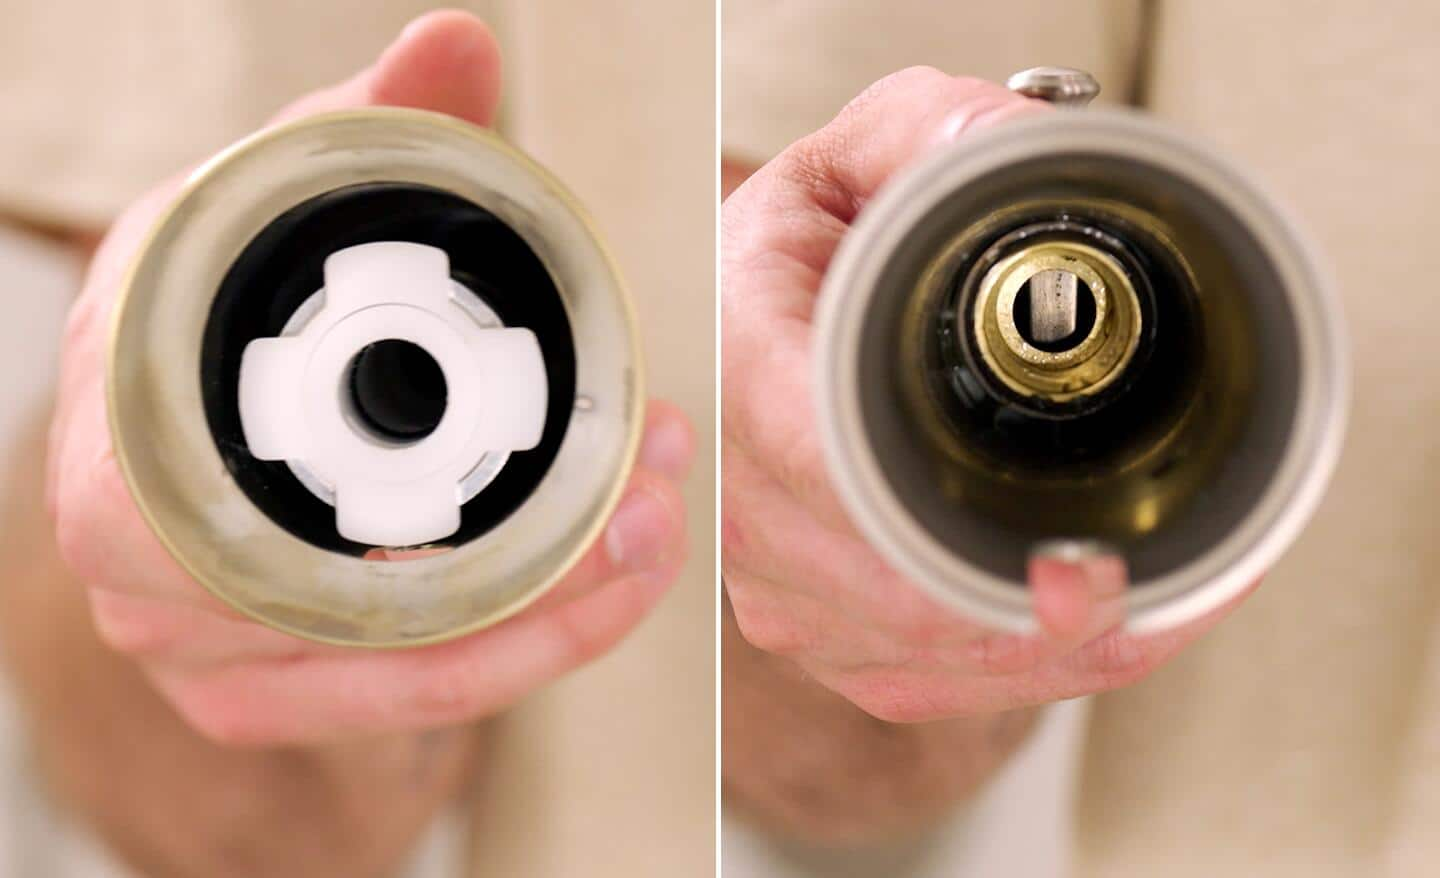
Single-handle cartridge faucet
- Pry off the handle cap. Loosen the set screw or top screw. Pull the handle off.
- Remove the trim and retaining clip or nut. Note the cartridge orientation.
- Pull the cartridge straight out. Use a puller if stuck.
- Clean the valve body with vinegar and a brush. Rinse and wipe dry.
- Grease O-rings on the new cartridge. Insert it in the same orientation.
- Reinstall the clip or nut. Reassemble trim and handle.
- Turn water on. Test hot and cold and check for drips.
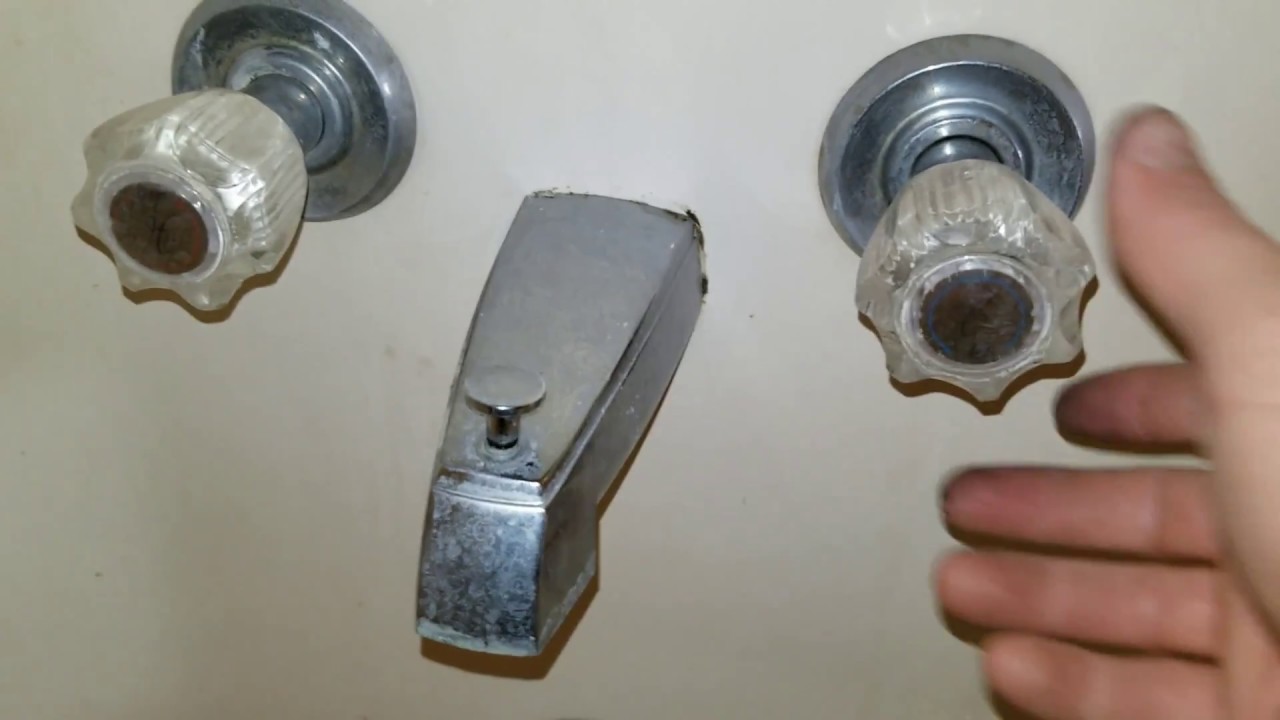
Two-handle compression faucet
- Remove the handle and escutcheon.
- Use a wrench to unscrew the stem assembly.
- Replace the rubber washer on the stem. Check and replace the packing or O-ring.
- Inspect the valve seat inside the body. Replace the seat with a seat wrench if it is pitted.
- Reassemble. Do the other side if the drip remains.
Two-handle ceramic disc faucet
- Remove the handle and trim.
- Lift out the ceramic cartridge or disc unit.
- Clean the valve body. Replace any O-rings and the disc unit if chipped.
- Reassemble and test. Do not over-tighten. Ceramic can crack.
Ball-type single handle
- Remove the handle and dome cap.
- Take out the ball, springs, and rubber seats.
- Replace the springs and seats as a set.
- Reassemble in the same order. Align the ball tab with the slot.
Pro tip: When learning how to fix bathtub faucet leaks fast, lube parts with plumber’s grease. This helps seals seat well and makes future service easy.

Fix a dripping tub spout or diverter
A spout drip can come from the valve or the spout itself. Check both.
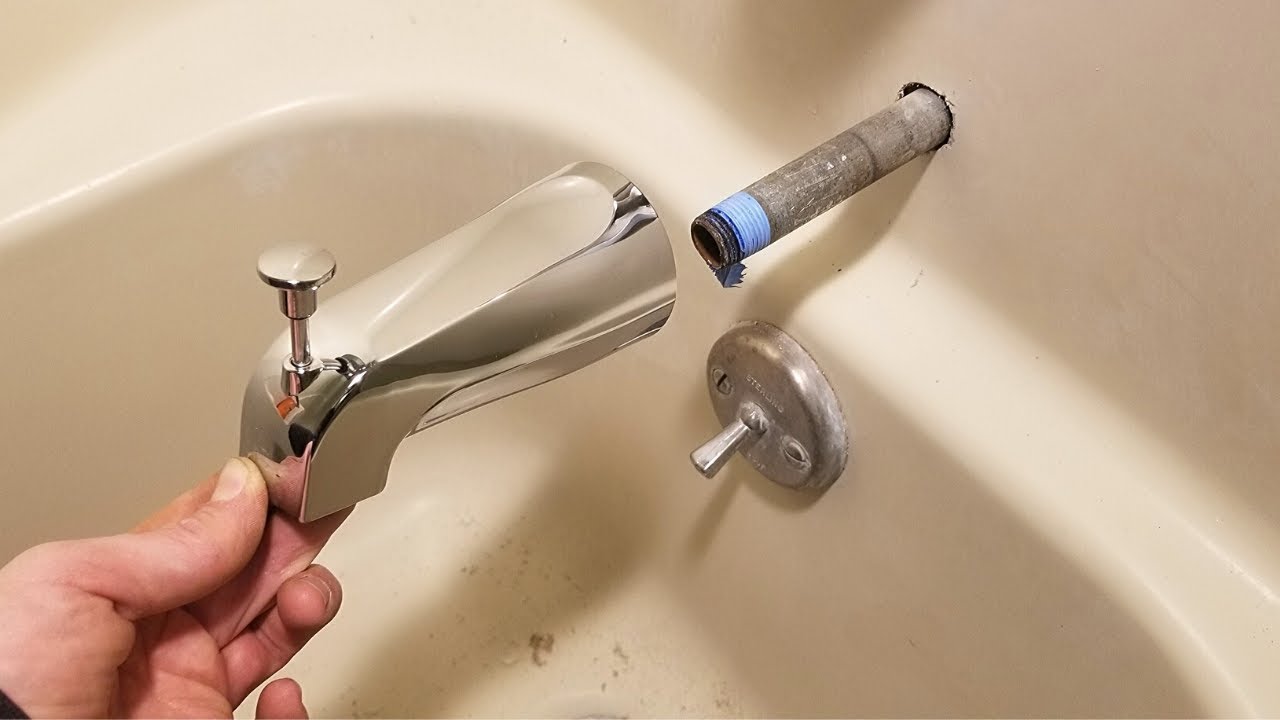
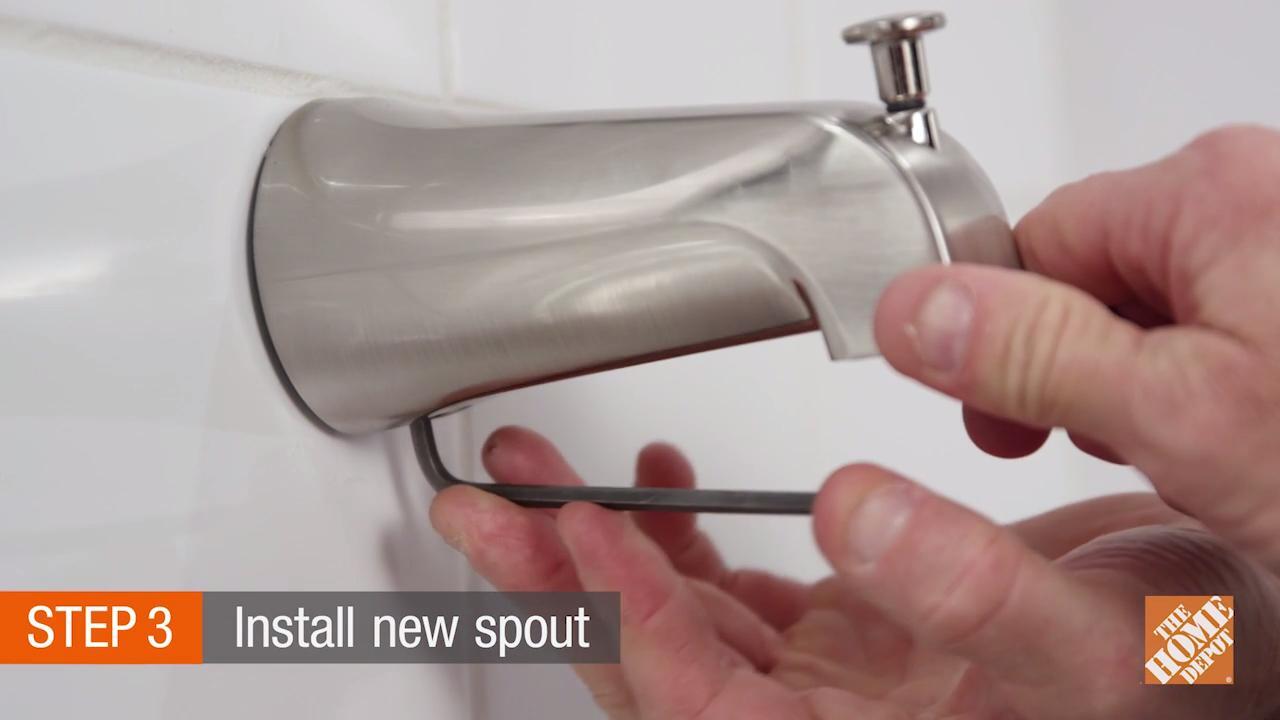
To replace a tub spout:
- Look under the spout near the wall. If you see a small hole, it is a slip-fit. Loosen the set screw and pull it off.
- If there is no hole, it likely threads on. Turn counterclockwise to remove. Wrap the pipe with a cloth to protect it.
- Clean the pipe. For slip-fit, slide the new spout on and tighten the set screw. For threaded, wrap threads with Teflon tape and screw on until snug and aligned.
To fix a diverter that leaks to both shower and tub:
- Replace the spout if the diverter is built in. Internal parts wear out.
- For a three-handle setup, remove the diverter stem. Replace the washer, O-rings, or the full stem.
This is a quick win in how to fix bathtub faucet issues that waste water.
Stop leaks at the handle escutcheon
Water behind the wall can cause mold and damage. Seal it right.
Steps:
- Remove the handle and trim plate.
- Replace worn O-rings or packing on the stem.
- Add a thin bead of silicone around the escutcheon edge where it meets the wall.
- Reinstall parts and wipe away excess sealant.
This small fix adds years to your valve and walls while you learn how to fix bathtub faucet leaks like a pro.
:max_bytes(150000):strip_icc()/how-to-replace-a-bathtub-faucet-5210836-08-dde7e85413a9421cb4414bb4655e49e3.jpg)
Low water pressure or temperature issues
Low flow often means a blocked cartridge or half-closed stops.
Check this:
- Remove the cartridge and flush the valve body for 5 to 10 seconds.
- Make sure local shutoff stops are fully open.
- If your valve has an anti-scald limit stop, adjust per the manual to allow more hot blend. Keep safe max at about 120°F.
These steps solve many flow and temp problems tied to how to fix bathtub faucet performance.

Rebuild or replace the valve body
Sometimes the body is shot. Corrosion, cracks, or stripped threads mean replace.
What to know:
- Access may require opening the wall behind the tub. Many homes have a rear access panel. If not, you may cut and patch drywall.
- New valves often use PEX or copper. Soldering near the tub needs flame-safe tools and shields.
- You may need permits and code checks. Pressure balancing or thermostatic valves are often required.
- If piping is old galvanized or there is no shutoff, call a pro.
This is the deep end of how to fix bathtub faucet work. Do not risk hidden leaks.
Maintenance tips to prevent future leaks
A few minutes a year pays off.
- Exercise the handles once a month. Full open and close keeps seals fresh.
- Wipe soap scum from trim and spout. Gunk wears parts.
- Use plumber’s grease on O-rings during service.
- Add a whole-home sediment filter if you have grit in water.
- Do not crank handles tight. Snug is enough.
These steps cut the need to learn how to fix bathtub faucet problems again soon.
Real-world example and pro tips
A client called about a drip that came back in two weeks. It was a two-handle compression valve. The last tech swapped only the washers. The seats were pitted, so the new washers failed fast.
What I did:
- Shut water, pulled stems, and found rough seats.
- Replaced both seats and stems. Greased O-rings and packed the stems.
- Sealed the escutcheon and set the handles even.
Lessons you can use:
- Always inspect the seat. If it is pitted, replace it.
- Do both sides at once. Parts age as a pair.
- Take a photo of the cartridge position before removal.
With these steps, you will nail how to fix bathtub faucet leaks that like to return.
Cost, time, and skill check
Plan your time and budget.
Typical ranges:
- Washer and seat service: 30 to 60 minutes, under 20 dollars.
- Cartridge swap: 30 to 90 minutes, 20 to 120 dollars based on brand.
- Spout with diverter: 15 to 30 minutes, 20 to 60 dollars.
- Full valve replacement: 3 to 6 hours, 200 to 800 dollars for parts, more with wall repair.
Match the job to your comfort level. If you are new to how to fix bathtub faucet issues, start small and build skill.
When to call a licensed plumber
Know your limits. A smart call can save walls and money.
Call a pro if:
- You cannot shut water off locally or at the main.
- Threads are stripped, parts are seized, or the valve body is cracked.
- You have old galvanized or mixed pipe types.
- You need to open a tiled wall or solder near flammable parts.
- You want to upgrade to a code-compliant pressure-balance or thermostatic valve.
A pro can also guide you on how to fix bathtub faucet upgrades that boost safety and value.
Frequently Asked Questions of how to fix bathtub faucet
How do I know which cartridge I need?
Remove the old cartridge and take it to a store. Match brand and shape, or use the model number from the trim kit.
How long should a bathtub faucet cartridge last?
Many last 5 to 10 years, longer with clean water. Hard water or grit lowers life, so add filtration if needed.
Do I need plumber’s putty or silicone on the tub spout?
Use Teflon tape on threaded spouts. For slip-fit spouts, no putty is needed, but a thin silicone bead at the wall can help seal.
Why does my faucet still drip after replacing washers?
The valve seat may be pitted or cracked. Replace or resurface the seat and check the stem and packing.
Can I fix a leaking bathtub faucet without turning off the main water?
Only if your tub has local shutoff stops. If not, turn off the main to avoid a flood.
Why is my handle hard to turn?
Mineral buildup or worn stems cause friction. Clean and grease parts or replace the stem or cartridge.
Is it normal for a few drops to come out after shutoff?
A few leftover drops are normal. A steady drip means a seal is not seating and needs service.
Conclusion
You can fix most tub leaks in an hour with simple tools and the right parts. Shut the water, identify the valve, replace the worn pieces, and test. With these steps, you now know how to fix bathtub faucet problems with confidence.
Choose one small task today. Stop the drip, replace that spout, or grab the right cartridge. Share your results, ask a question, or subscribe for more hands-on repair guides.

Table of Contents