Tighten the handle by removing the cap, snugging the screw or nut, and reassembling.
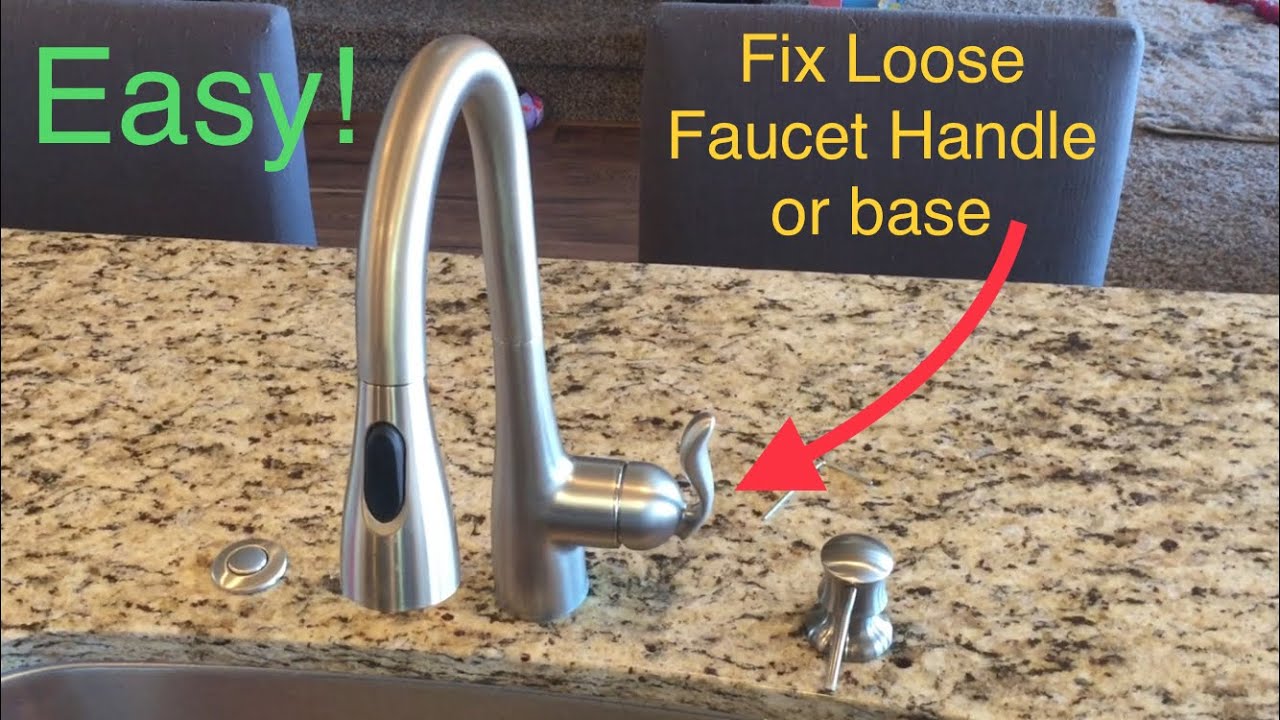
If your faucet handle wiggles, squeaks, or won’t stop at the right spot, I can help. I’ve fixed hundreds of loose handles in kitchens and baths. This guide shows you how to tighten faucet handle the right way, with clear steps, photos-in-mind tips, and pro tricks to avoid damage. If you want to learn how to tighten faucet handle on any brand or style, you’re in the right place.

Safety, Tools, and Prep
A loose handle is annoying, but the fix is simple. Work slow. Protect the finish. Have the right tools ready.
Tools you may need:
- Small flathead screwdriver or pick to lift the cap
- Phillips screwdriver and slotted screwdriver
- Hex key set for set screws, often 1/8 inch or 3/32 inch
- Adjustable wrench or socket set
- Needle-nose pliers
- Plumber’s grease, threadlocker gel (removable), plumber’s tape
- Soft cloth or tape to guard the finish
Prep steps:
- Shut off water if you will open any valve or packing nut.
- Plug the drain so small screws do not fall in.
- Lay a towel to protect the sink deck.
Pro note from the field:
- If the handle turns but does not move the valve, you likely have a stripped set screw or worn spline. Tightening alone will not fix that.

Identify Your Faucet Handle and Mechanism
Not all handles tighten the same way. Spot the type first. This saves time and stops damage.
Common types:
- Set-screw handle. A tiny screw on the side or back holds the handle to a stem. You will use a hex key.
- Cap-and-screw handle. Pop a decorative cap. Under it is a Phillips screw that holds the handle.
- Compression two-handle. Each handle has a packing nut under the handle. The nut can loosen over time.
- Ceramic disc or cartridge. Many single-handle faucets use a retaining nut or dome cap that can loosen.
- Ball-type. Uses an adjusting ring with two flats. A loose ring causes play in the handle.
If you wonder how to tighten faucet handle on a certain brand, check the manual or an exploded parts diagram. Models vary by year.

Step-by-Step: how to tighten faucet handle (Universal Method)
Before you start, learn how to tighten faucet handle without scuffing the chrome. Use a cloth under tools. If you searched how to tighten faucet handle because it wobbles side to side, this is the fast path. This method also works if you are trying how to tighten faucet handle in a bathroom or kitchen.
Follow these steps:
- Find the cap. Look for a small button marked H or C, or a blank coin-size cap.
- Pry the cap. Use a small flathead. Twist gentle. Do not gouge the finish.
- Tighten the screw. Use the right driver. Turn clockwise. Go snug, not brutal.
- Test the handle. Move it through its range. If the wobble is gone, you are done.
- If still loose, remove the handle. Check for a set screw on the side or back. Snug it with the correct hex key.
- Still loose? Inspect the stem or spline. If stripped, you need a new handle or stem.
PAA-style quick checks:
- Can I skip turning off water? You can if you only tighten a top screw. If you touch a packing nut or valve body, shut it off.
- Why does it loosen again in weeks? The screw may be slightly short, threads dirty, or there is hidden play in the stem. Clean threads and add a tiny dab of removable threadlocker.
- Do I grease anything? Yes. A pea of plumber’s grease on the spline can stop squeaks and ease future service.

Step-by-Step by Faucet Type
Single-Handle Cartridge (common in kitchen and bath)
- Pop the cap and remove the handle screw.
- Lift the handle off. Snug the dome cap or retaining nut under it.
- Reinstall the handle and tighten the set screw or top screw.
Two-Handle Compression
- Remove the handle cap and screw. Pull the handle.
- Snug the packing nut on the valve stem one eighth turn.
- Test for leaks and handle feel. Do not over-tighten or the valve will feel stiff.
Ceramic Disc
- Remove handle. Tighten the large retaining nut that holds the cartridge.
- If the handle still rocks, inspect the handle adapter. Replace worn parts.
Ball Faucet
- Remove handle. Tighten the adjusting ring using pliers with a cloth, or the special tool.
- Aim for smooth movement with no slack. Too tight will bind.
Kitchen Pull-Down Single-Handle
- Remove set screw at the back or under the lever.
- Snug the dome cap by hand, then a touch with a wrench. Protect the finish with tape.
Knowing how to tighten faucet handle on a single-handle cartridge or a two-handle setup helps in most homes. If you get stuck, note the brand stamp under the spout. Parts are brand-specific.

When Tightening Is Not Enough: What to Replace
Sometimes how to tighten faucet handle turns into a small parts swap. That is normal. The fix is still simple.
Common worn parts:
- Set screw. Heads strip. Replace with the same size and length. Many use 10-24 or M5 threads with a 1/8-inch hex.
- Handle adapter or spline insert. Soft metals round off. A new adapter restores a tight fit.
- Stem or cartridge. If the stem wobbles, the cartridge bearings or seals may be shot.
- Packing or O-rings. A loose packing nut can hide wear. New rings stop leaks and play.
Signs you need parts:
- Handle still rocks after screws and nuts are snug.
- You hear grinding or feel gritty motion.
- The handle slips without moving water flow.
Tip:
- Take the old part to the store for a match. Or use the faucet model number to order exact parts.
Troubleshooting: Common Snags and Easy Fixes
These are the problems I see most and how I solve them fast.
- Stripped set screw. Tap in a fresh, correct-size hex key. Press hard. Turn slow. If it rounds more, cut a slot with a micro saw and use a flathead.
- Frozen dome cap. Wrap with a rubber jar opener. Add a drop of penetrating oil. Wait ten minutes. Turn gently with padded pliers.
- Handle stuck on spline. Rock it up with two spoons padded with tape. Pull even to avoid bending.
- Cap will not pop. Warm the cap with a hair dryer for 20 seconds. Try again with a plastic pry tool.
- Over-tightened packing nut. If the handle feels stiff, back off the nut one sixteenth turn. Test and repeat.

Preventive Care To Keep Handles Tight
A five-minute habit can save you a future headache. It also makes water flow feel smooth.
- Add “how to tighten faucet handle” checks to your seasonal list.
- Once a year, pull the cap. Snug the screw. Wipe corrosion.
- Add a tiny dab of plumber’s grease on the spline and O-rings.
- If you host guests often, check weekly. Extra use speeds loosening.
This is how I keep client callbacks low. A little care now beats a full rebuild later.

Time, Cost, and Skill Level
You can do this fix in under ten minutes. Most jobs use only a screwdriver and hex key.
- Time. 5 to 15 minutes per handle.
- Cost. Often free. A new set screw or cap is a few dollars. A cartridge can be 15 to 60 dollars.
- Skill. Beginner friendly. Good lighting and patience help.
If you plan how to tighten faucet handle while updating other parts, group tasks to save time. For example, clean aerators and snug supply nuts in the same visit.
Pro Tips and Mistakes To Avoid
From years of repairs, here is what works and what trips people up.
What works:
- Photograph each step. Reassembly is easy with a quick photo trail.
- Use the exact driver size. A loose driver strips heads.
- Add a drop of removable threadlocker to set screws that back out often.
What to avoid:
- Over-torquing. Tight plus a hair. Not tight plus force.
- Metal on metal. Always pad pliers and wrenches near the finish.
- Skipping model research. Not all dome caps or cartridges tighten the same way.
My shortcut for how to tighten faucet handle on Moen and Delta: snug the dome by hand, then nudge with a padded wrench. Then set the handle and finish with the set screw. It stays tight and looks clean.
Frequently Asked Questions
How do I know if the handle screw or the stem is the problem?
If tightening the screw removes the wobble, the screw was loose. If the handle still rocks, the stem spline or adapter is worn.
Can I learn how to tighten faucet handle without shutting off water?
Yes, if you only snug a handle screw or set screw. If you touch a packing nut or cartridge nut, shut off water first.
How to tighten faucet handle with a stripped screw?
Try a fresh, correct-size hex key and press hard. If it fails, cut a small slot and remove with a flathead, then replace the screw.
What if the handle keeps loosening every few days?
Clean the threads and the underside of the screw head. Add a tiny dab of removable threadlocker and snug to firm, not force.
Do I need special grease?
Use plumber’s silicone grease only. Do not use petroleum grease; it can swell rubber seals.
Will this fix also stop a drip?
Not usually. Tightening a handle removes wobble. A drip means a worn washer, cartridge, or seat that needs replacement.
Is how to tighten faucet handle different for wall-mount faucets?
Steps are the same, but access is tighter. Protect the wall plate finish and avoid over-torquing the packing nut.
Can I damage the ceramic cartridge by over-tightening?
Yes. Overtightening the retaining nut can crack the cartridge or bind movement. Snug to spec and test as you go.
Conclusion
You now know how to tighten faucet handle on most sinks in a few simple steps. Start with the cap, snug the right screw or nut, and test. If play remains, swap the small, cheap parts before the big ones.
Do one handle today. Build the habit into your home care list. If this helped, share it with a friend, subscribe for more easy fixes, or leave a comment with your faucet brand and question.

Table of Contents