Shut off water, remove both handles, swap worn parts, reassemble, and test.
You can learn how to fix two handle leaky faucet in one afternoon with simple tools, the right parts, and a calm plan. I have fixed hundreds of two-handle faucets in homes old and new. This guide gives clear steps, key checks, and pro tips so you can stop the drip, save water, and avoid bigger damage.

Why two-handle faucets leak (and how that guides the fix)
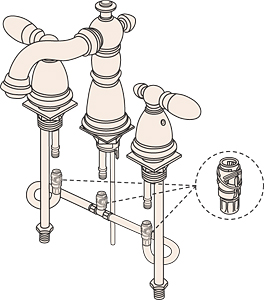
Two-handle faucets leak for a few common reasons. The most common are worn washers, cracked cartridges, dry O-rings, and grooved valve seats. Hard water speeds up wear. Loose packing nuts or handle screws can also let water pass.
There are two main valve styles under two handles:
- Compression. Uses a rubber washer that presses on a metal seat. Drips mean the washer or seat is worn.
- Cartridge or ceramic disc. Uses a cartridge or disc set with O-rings. Drips mean the cartridge or seals are worn or clogged.
Knowing the style tells you what to buy and how to fix two handle leaky faucet the right way the first time.
Signs that help you ID the cause:
- Drip only from one side. The problem is in that handle’s valve.
- Drip stops when you push the handle harder. Compression style with a worn washer.
- Leaks at the base of the handle. Bad O-ring or loose packing nut.
- Sputter and uneven flow. Mineral buildup in the cartridge or aerator.
:max_bytes(150000):strip_icc()/repair-a-two-handle-cartridge-faucet-1824887_07_complete_4919-d2621a771eff4c119902d1f90bb1caef.jpg)
Identify your faucet type
Look at the handle travel and parts:
- If the handle turns several full turns and feels “screw-like,” it is likely compression.
- If the handle turns a quarter or half turn, it is likely a cartridge or ceramic disc.
Quick checks:
- Pop the index cap. Remove the handle screw. Lift the handle. You will see either a stem with a washer (compression) or a cartridge body (cartridge type).
- Search the faucet brand and model if you can find a logo. The brand helps you match parts.
Tip from the field: Take a clear photo of the valve as you open it. This helps you align parts when you put it back.

Tools and replacement parts
You do not need fancy gear to learn how to fix two handle leaky faucet. You need a few basics.
You will likely use:
- Adjustable wrench
- Phillips and flat screwdrivers
- Hex key set for set-screws
- Slip-joint pliers with tape on the jaws
- Needle-nose pliers
- Utility knife
- Plumber’s silicone grease
- Teflon tape (PTFE) for threaded parts
- White vinegar and a soft brush for scale
- Towels and a small bucket
- Flashlight and phone for photos
Common parts:
- Compression style: seat washer, screw for washer, packing washer, and valve seat if pitted
- Cartridge style: new cartridge set or ceramic disc set, plus O-rings
- Handle index caps, stems, and trim as needed
- Aerator screen if clogged
Pro tip: Bring the old stem or cartridge to the store. Match it by size and brand. This prevents a second trip.
:max_bytes(150000):strip_icc()/repair-a-two-handle-cartridge-faucet-1824887-06-41a97373b2104f8188ec7bbd5c97fbb1.jpg)
Prep and safety checklist
A little prep prevents big messes. Follow this before you start how to fix two handle leaky faucet.
- Shut off water at the supply stops under the sink. Turn both clockwise.
- Open both handles to release pressure. The water should go quiet.
- Plug the drain with a stopper or tape. Small screws love drains.
- Lay down a towel in the sink. This saves parts and your porcelain.
- Take photos at each step. You will thank yourself during reassembly.
If stops are stuck, use gentle turns. Do not force old valves. If they seep, plan to replace them soon.

Step-by-step: how to fix two handle leaky faucet
Follow the path for your faucet type. Work on the side that drips first. If one side is bad, the other is often close behind.
For compression faucets (rubber washer and seat)
- Remove handle and trim
- Pry off the cap.
- Remove the screw. Lift the handle.
- Unscrew the trim sleeve and expose the packing nut.
- Remove the stem
- Hold the valve body with one wrench.
- Loosen the packing nut with another.
- Unscrew and pull out the stem.
- Inspect and replace parts
- Check the rubber washer at the stem tip. If it is brittle, cracked, or cupped, replace it.
- Check the brass valve seat inside the faucet body with a light.
- If the seat is pitted or grooved, use a seat wrench to remove and replace it. If not removable, use a seat-dressing tool to smooth it.
- Rebuild the stem
- Install a new washer and screw. Do not overtighten the screw.
- Replace the packing washer or add a small wrap of PTFE on the stem threads if needed.
- Apply a light coat of silicone grease to moving parts and O-rings.
- Reassemble
- Thread the stem back in. Snug the packing nut just enough to stop leaks while keeping the handle smooth.
- Reinstall trim and handle.
- Test
- Open supply stops. Run water. Check for drips at the spout and around the packing nut.
- If the handle feels stiff, back off the packing nut a touch.
Common mistake to avoid: Over-tightening the handle to stop a drip. This crushes the washer and digs the seat, which makes leaks worse.
For cartridge or ceramic disc faucets
- Remove handle and expose the cartridge
- Lift off the cap and screw. Pull the handle.
- Remove any retaining clip or bonnet nut. Note its position.
- Extract the cartridge
- Grip the cartridge body and pull straight up.
- If stuck, wiggle gently. Do not twist hard. You can crack it.
- Clean and inspect
- Look for torn O-rings or cracks.
- Soak the aerator and the old cartridge in vinegar to dissolve light scale if you plan to test it. But if it leaked before, replace it.
- Install new cartridge and seals
- Match hot and cold orientation. Many have tabs or arrows.
- Lube O-rings with silicone grease.
- Seat the cartridge fully. Install the clip or bonnet nut snug, not overtight.
- Reassemble and test
- Put the handle back on. Turn stops on.
- Run both sides. Check for drips and smooth travel.
Pro tip: Some cartridges look alike but have different depths or tabs. If it will not seat flush, you likely have the wrong part.
:max_bytes(150000):strip_icc()/repair-a-two-handle-cartridge-faucet-1824887_05_buy_4915-5fdf148cf7fc44e4bf91871558e69936.jpg)
Testing and troubleshooting after the repair
Run water for 30–60 seconds. Check the spout, handle bases, and under-sink area. This is a key step in how to fix two handle leaky faucet with confidence.
If a drip remains:
- On compression: Try a slightly thicker washer. Or replace the valve seat.
- On cartridge: Confirm the cartridge is fully seated and the clip is set.
- Tighten the packing nut one-eighth turn if it weeps at the stem.
- Flush the lines. Remove the aerator and run water to clear debris.
- If your shutoff valves weep, snug the packing nut there too.
If handles are reversed hot/cold, swap the stems or rotate the cartridge per the manual.
Costs, time, and when to call a pro
Typical DIY time is 45–90 minutes for one side. Add time for stuck trim or heavy scale.
Common costs:
- Washers and O-rings: a few dollars
- New seat: low cost
- Cartridges: mid to higher cost per side, brand dependent
- Tools you may need to buy: modest one-time cost
Call a pro when:
- The shutoff valves will not close or they leak badly
- The valve seat is fixed and heavily pitted
- The faucet body is cracked or corroded through
- You replaced parts and it still leaks
- You see water stains in the cabinet or on the ceiling below
Knowing when to get help is part of how to fix two handle leaky faucet the smart way. It saves time and prevents damage.
/repair-a-two-handle-cartridge-faucet-1824887_06_install_4917-77afdd653b3d4ec1afe75ecff7eed615.jpg)
Ongoing care to prevent leaks
Small habits extend faucet life and keep seals happy.
- Do not crank handles tight. Gentle off is enough.
- Clean the aerator twice a year. Soak it in vinegar.
- If water is hard, use a scale remover on parts each year.
- Move both handles weekly if the bath is a guest bath. Idle seals dry out.
- Keep a small kit of washers, O-rings, and silicone grease on hand.
With care, you will go years between repairs. This simple plan also supports how to fix two handle leaky faucet fast if a drip returns.
 faucet”
style=”max-width: 100%; height: auto; border: 2px solid black; border-radius: 10px; display: block; margin: 0 auto;”
loading=”lazy”
/>
Frequently Asked Questions of how to fix two handle leaky faucet
### How do I know if I have a compression faucet or a cartridge faucet?
If the handle needs several full turns to close, it is compression. If it turns a quarter or half turn, it is cartridge or ceramic disc.
Do I need to replace both sides if only one leaks?
It is not required, but it is smart. Parts age the same, so fixing both sides saves time and stops a near-future drip.
What size washer do I need for a compression faucet?
Most common sizes are quarter-inch or three-eighths inch, but sizes vary. Bring the old washer and stem to the store to match it.
Can I use petroleum jelly on O-rings?
No. Use silicone-based plumber’s grease only. Petroleum can swell rubber and cause leaks.
Why does my faucet still drip after I replaced the washer?
The valve seat may be pitted or cracked. Replace or dress the seat, and confirm the washer screw is snug and the stem is seated flat.
Is Teflon tape needed on every thread?
Use PTFE tape on threaded seats and bonnet nuts when the maker says so. Do not use tape on cartridge bodies that seal with O-rings.
How tight should the packing nut be?
Snug only until seepage stops and the handle turns smooth. Over-tightening makes the handle stiff and wears the stem.
Will a new cartridge fix low flow?
If the cartridge is clogged, yes. Also check the aerator and supply stops for debris and make sure the shutoffs are fully open.
Conclusion
You now know how to fix two handle leaky faucet from start to finish. Identify your faucet type, swap the right wear parts, and test with care. A calm approach, light grease, and the right washer or cartridge stop the drip and protect your home.
Set a time this week to gather parts and do the job. If anything feels beyond your tools or time, call a pro early. Share your results or questions in the comments, and subscribe for more clear, hands-on home fixes.

Table of Contents