You’ve probably reached for that pint of fresh berries or a warm slice of pie, only for your homemade whipped cream dreams to be a bit…deflated. It happens to the best of us. But what if I told you that achieving perfectly fluffy, homemade whipped cream is surprisingly simple, especially when you have the right tool?
This guide is dedicated to cracking the code on how to make whipped cream in a personal blender. Forget tedious whisking or waiting for chilled bowls; your personal blender can be your secret weapon for instant creamy goodness.
We’ll dive deep into the nitty-gritty, covering everything from the ideal ingredients to the precise technique needed to turn liquid cream into cloud-like peaks. Whether you’re a seasoned baker or just someone who loves a dollop of sweetness, by the end of this, you’ll be whipping up batches of delicious homemade whipped cream like a pro, all thanks to your trusty personal blender. We’re not talking about a complex culinary feat here; it’s about convenience and great results.
The Magic Ingredients: What You Need for Perfect Personal Blender Whipped Cream
Before we get to the action, let’s talk about what makes this simple recipe work. The beauty of whipped cream is its brevity; fewer ingredients mean better flavor shines through. For how to make whipped cream in a personal blender, you really only need a few key players.
First and foremost is your cream. I always reach for heavy whipping cream. This has a high fat content (at least 30-36%) which is absolutely crucial for creating stable whipped cream.
Anything lower, like half-and-half or light cream, just won’t emulsify properly and will likely result in a sad, soupy mess. It’s essential that the cream is very cold. If it’s not cold enough, it won’t whip up as effectively.
Some folks even swear by chilling the carton in the freezer for about 15-20 minutes beforehand, just to get that extra chill.
Next up is your sweetener, and granulated sugar is the classic choice. It dissolves easily and provides that familiar sweetness. However, you can absolutely get creative here!
Powdered sugar (confectioners’ sugar) works wonderfully too, and tends to incorporate more smoothly, reducing the risk of a gritty texture. If you’re looking for a different flavor profile, a touch of maple syrup or honey can be used, though be mindful that these liquid sweeteners can sometimes make the whipped cream a little less stiff.
A flavoring agent is pretty much non-negotiable for me. The pure taste of vanilla extract is what most people associate with classic whipped cream, and for good reason. A teaspoon or so really elevates the flavor.
Again, don’t be afraid to experiment! Almond extract, peppermint extract, or even a bit of citrus zest can add a delightful twist.
Finally, for an advanced technique to achieve even more stable peaks, a tiny pinch of cream of tartar or a tablespoon of powdered milk can be added. These act as stabilizers, helping your whipped cream hold its shape longer, which can be a lifesaver for desserts that sit out for a while.
Understanding Your Personal Blender for Whipped Cream Success
Personal blenders, often called single-serve blenders, are fantastic for their convenience. They’re quick, easy to clean, and perfect for small batches. But when it comes to how to make whipped cream in a personal blender, understanding their limitations and strengths is key.
These blenders typically have a more powerful motor for their size compared to many hand mixers, which is a huge advantage for whipping cream. The compact design also means the blades are closer to the ingredients, which can help in the emulsification process.
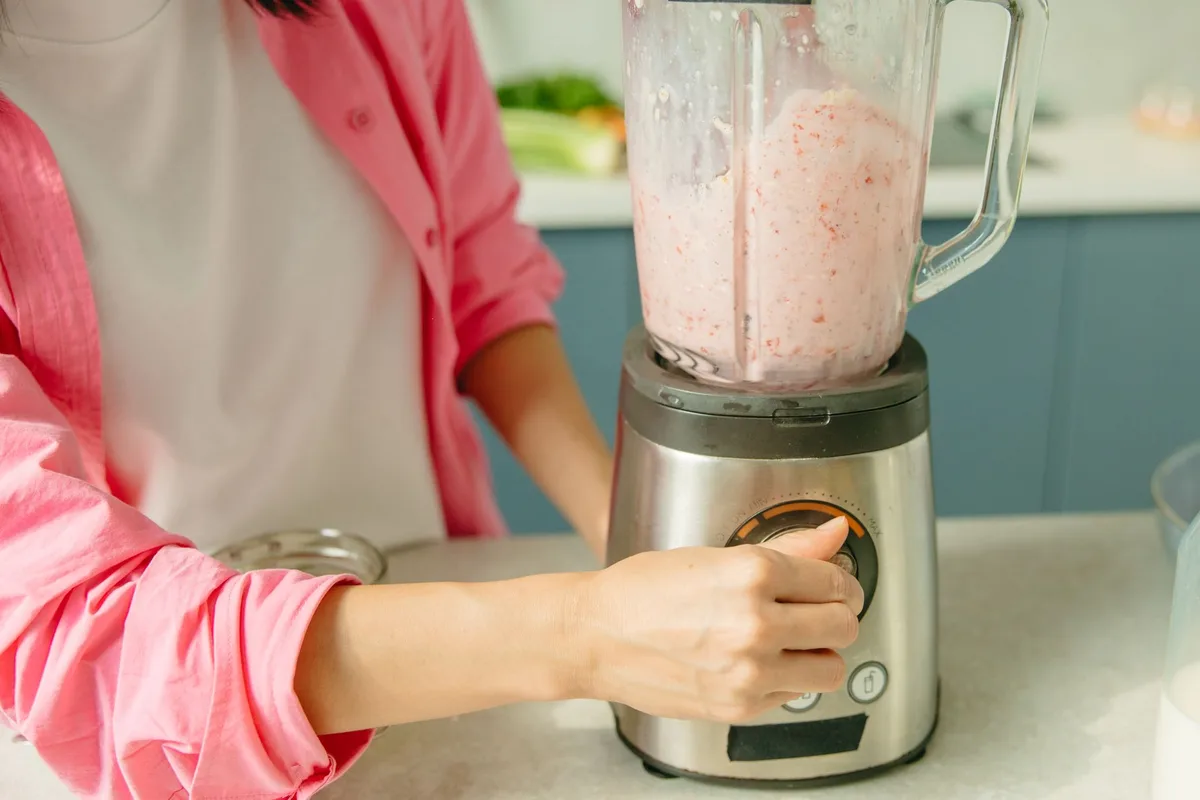
Image source: Pexels / Yaroslav Shuraev (Pexels License)
However, it’s important to remember that personal blenders are designed for blending, not necessarily for the delicate aeration required for perfect whipped cream as a stand mixer might achieve. You won’t get the same volume as you might with a large stand mixer that incorporates a lot of air. The goal here is a wonderfully smooth, moderately fluffy cream that’s ready in seconds.
The blade assembly is crucial. Most personal blenders have a blade unit that screws onto the cup. For whipping cream, you want to ensure this assembly is clean and securely attached.
The short, powerful bursts of blending are what will transform your cream. It’s a different process than the continuous whisking you might do by hand.
When you’re looking at how to make whipped cream in a personal blender, consider the model you have. Some have multiple speed settings, while others are a simple on-off operation. For whipped cream, pulsing is often your best friend.
It gives you more control and prevents over-beating. I’ve found that a very cold blade assembly can also help, though that’s often overlooked. Just unscrew the blade, give it a quick rinse under cold water, and dry it thoroughly before attaching.
The Step-by-Step Guide: Making Whipped Cream in Your Personal Blender
Alright, let’s get down to the business of how to make whipped cream in a personal blender. It’s remarkably straightforward, and the speed at which you’ll have delicious whipped cream is truly amazing.
First, make sure your personal blender cup and the blade assembly are thoroughly chilled. I often pop mine in the freezer for about 15 minutes while I gather my ingredients. This extra step might seem small, but it really helps keep the cream cold, which is vital for proper whipping.
Pour 1 cup of very cold heavy whipping cream into your chilled blender cup. This is the base for your whipped cream. Don’t overfill it; personal blenders work best with at least a minimum amount of liquid but shouldn’t be packed too full, as you need space for air to be incorporated.
Next, add your sweetener. For a classic sweet whipped cream, I usually add 2 tablespoons of granulated sugar or powdered sugar. You can adjust this to your taste.
If you’re using liquid sweeteners like maple syrup or honey, start with 1 tablespoon and add more if needed after tasting.
Now for the flavor! Add 1 teaspoon of pure vanilla extract. If you’re planning to use other extracts or zests, now’s the time to add them.
A little goes a long way, so start with smaller amounts and adjust to your preference.
Secure the blade assembly onto the blender cup. Double-check that it’s tightened properly to avoid any leaks.
Now, it’s time to blend! This is where you need to be attentive. You’re not looking for a smooth liquid; you’re looking for aeration.
Start by pulsing the blender for about 10, 15 seconds. You’ll hear the sound change as the cream starts to thicken. Stop the blender, remove the cup, and gently swirl or shake it.
This helps to redistribute the cream and ensure even whipping.
Continue pulsing in short bursts, checking the consistency after each one. You want to stop once you reach your desired stiffness. For soft peaks, this might only take another 10, 15 seconds of pulsing.
For medium or firm peaks, you might need a few more short bursts, perhaps 5, 10 seconds each, always followed by a swirl or shake. I’ve found that over-blending is the most common pitfall, quickly turning your whipped cream into butter! It’s better to under-blend and give it a few more pulses than to over-blend.
Once you achieve your desired consistency, remove the blade assembly. Your luscious whipped cream is ready to serve! I like to serve it immediately for the freshest taste and best texture.
The Art of Perfect Peaks: Soft, Medium, and Firm
When it comes to how to make whipped cream in a personal blender, understanding the different “peak” consistencies is crucial for various dessert applications. It’s not just about getting it “whipped”; it’s about getting it just right.
Soft Peaks: These are the most delicate. When you lift the blend-cup (or a spoon after transferring), the cream will form a peak that gently curls over on itself, much like a soft wave. This is perfect for folding into other desserts, like mousses or cake batters, where you want a light, airy texture that doesn’t hold a stiff shape.
For soft peaks, you’ll blend for the shortest amount of time, likely just a few short pulses until the cream just begins to thicken and hold a loose shape.
Medium Peaks: This is often the sweet spot for general topping. When you lift the blend-cup or a spoon, the peak will stand up straighter but the tip will still curl over slightly. It’s a good balance between airy and substantial.
This is ideal for topping pies, tarts, or serving alongside fresh fruit. Achieving medium peaks usually involves a few more pulses than soft peaks, with brief pauses in between to check. You’ll notice the cream becoming noticeably thicker and more opaque at this stage.
Firm Peaks: These peaks stand up straight, with no curling at the tip. They hold their shape firmly. If you turn the blend-cup upside down, the whipped cream should stay put.
This is great for piping decorative elements onto cakes or cupcakes, or when you need whipped cream to maintain its form for an extended period. To achieve firm peaks in a personal blender, you’ll need to be very observant, pulsing in very short bursts and checking frequently after each pulse. This stage happens quickly, and it’s the easiest to go from firm peaks to butter, so vigilance is key.
My personal preference for most uses is medium peaks. It offers a lovely balance of texture and stability, and it’s the most forgiving stage to aim for. Remember, the key to all these stages when using a personal blender is short bursts and frequent checking.
Troubleshooting Common Whipped Cream Woes
Even with the simplest recipes, sometimes things don’t go as planned. When figuring out how to make whipped cream in a personal blender, you might run into a few snags. Don’t worry, most are easily fixable!
Problem: My cream isn’t thickening at all.
This is almost always an issue of temperature or fat content. Did you use heavy whipping cream (at least 30% fat)? Is the cream, blender cup, and blade assembly sufficiently cold?
If not, try chilling everything again in the freezer for another 15-20 minutes and give it another go. Sometimes, a slightly warmer environment can hinder the process, so ensure your kitchen isn’t overly warm.
Problem: It’s turning into butter!
This is the classic over-blending scenario. Once the fat globules in the cream break and begin to clump together, they’ll go from whipped cream to butter very quickly. Unfortunately, there’s no direct “fix” to turn butter back into whipped cream.
However, you can often save the situation by adding a bit more cold heavy whipping cream (start with a tablespoon or two) and gently whisking or pulsing it very briefly by hand or with your blender’s lowest pulse setting to try and re-incorporate it. It might not be as light as before, but it can often be rescued.
Problem: My whipped cream is grainy or has undissolved sugar.
If you used granulated sugar, it might not have dissolved fully. This is more common if you blend for too short a time or at too low a speed, which isn’t usually an issue with personal blenders. Using powdered sugar (confectioners’ sugar) often prevents this problem entirely, as it’s pre-sifted and finer.
If your cream is already whipped but feels grainy, you can try transferring it to a bowl and gently stirring in another tablespoon of liquid cream or a tiny bit of milk to help the sugar dissolve. A quick, gentle whisk by hand might also help.
Problem: The whipped cream is too liquidy even after blending.
This can happen if the cream wasn’t cold enough or if there wasn’t enough fat content. If it’s still under-whipped and you can see it’s not thickening, try putting the whole blender cup back in the freezer for 10-15 minutes and then trying to blend again. If it’s already whipped but just a bit too soft for your liking and you’ve reached the maximum fluffiness your blender can achieve, you can try adding a stabilizer like a pinch of cream of tartar or a tablespoon of powdered milk and give it a very gentle pulse to incorporate.
It might not achieve stiff peaks but could increase stability slightly.
I’ve found that patience and observation are your greatest tools when how to make whipped cream in a personal blender. Stop, look, and listen. It’s better to check one too many times than to end up with an unintended dairy spread!
Enhancing Your Whipped Cream: Sweeteners, Flavors, and Stabilizers
While the classic recipe for how to make whipped cream in a personal blender is divine on its own, there’s a whole world of flavor and texture enhancements to explore. Getting creative with your ingredients can elevate your whipped cream from a simple topping to a star player in your desserts.
Sweeteners, Beyond the Basics:
- Powdered Sugar: As mentioned, this is a fantastic alternative to granulated sugar. It dissolves instantly, creating a smoother, silkier texture with no grit. It also contains a little cornstarch, which can lend a touch of extra stability. I often use a 1:1 ratio by volume for powdered sugar to heavy cream.
- Maple Syrup: For a different kind of sweetness, maple syrup adds a warm, rich flavor. Start with 1, 2 tablespoons per cup of cream, as it’s a liquid sweetener and can thus contribute to a less stiff cream if used in excess.
- Honey: Similar to maple syrup, honey offers a distinct floral or earthy sweetness. Use it sparingly, starting with 1 tablespoon per cup of cream, as its liquid nature impacts firmness.
- Agave Nectar: A neutral-tasting liquid sweetener that’s a good option for those seeking a vegan alternative if using a plant-based cream (though this guide focuses on dairy cream). Use like maple syrup, starting with 1, 2 tablespoons.
Flavor Adventures:
- Citrus Zest: A teaspoon of finely grated lemon, lime, or orange zest adds a bright, refreshing note. It cuts through richness beautifully and pairs wonderfully with fruit-based desserts.
- Cocoa Powder: For a chocolatey twist, add 1, 2 tablespoons of unsweetened cocoa powder along with your sweetener. Sift it to prevent lumps. This is fantastic for topping brownies or hot chocolate.
- Spices: A pinch of cinnamon, nutmeg, or cardamom can add warmth and complexity. This is especially nice during fall or winter holidays.
- Extracts: Beyond vanilla, experiment with almond, peppermint, coconut, or even a touch of coffee extract. Remember that extracts are potent; start with just 1/4 to 1/2 teaspoon and add more to taste.
- Liqueurs: A splash of Kahlúa, Grand Marnier, or Irish cream liqueur can add both flavor and a hint of boozy decadence. Be mindful that alcohol will slightly affect the stability, making the cream a bit softer.
Stabilizers for Longevity:
Sometimes, you need your whipped cream to hold up for a longer period, perhaps for a decorated cake or a buffet. This is where stabilizers come in.
- Cream of Tartar: A small pinch (about 1/8 to 1/4 teaspoon per cup of cream) can help stabilize the cream. Add it with the sugar.
- Powdered Skim Milk: This is another excellent stabilizer. Adding 1, 2 tablespoons of powdered milk (not to be confused with powdered sugar) per cup of cream can significantly improve its ability to hold shape. It works by absorbing some moisture and creating a network that supports the air bubbles.
- Gelatin: For the sturdiest whipped cream that won’t weep, bloomed gelatin is the way to go. Bloom 1/4 to 1/2 teaspoon of unflavored gelatin in 1 tablespoon of cold water for 5, 10 minutes, then gently warm it (microwave for a few seconds or use a double boiler) until it’s liquid but not hot. Let it cool slightly, then drizzle it into the cream very slowly during the last few pulses of blending, ensuring it’s fully incorporated without overpowering the whipping action. Be careful not to add hot gelatin; it can deflate the cream.
- Cornstarch: Similar to powdered sugar, a tiny bit of cornstarch (1/2 teaspoon per cup) can add stability. Ensure it’s well incorporated.
When experimenting with flavorings or stabilizers, remember my rule of thumb: start small. You can always add more, but you can’t take it away. The beauty of how to make whipped cream in a personal blender is its adaptability; you can tailor it precisely to your liking for any dessert.
Personal Blender Whipped Cream vs. Other Methods: A Quick Comparison
When you think about how to make whipped cream, your mind might immediately go to a stand mixer, a hand mixer, or even whisking by hand. While all these methods can produce delicious results, the personal blender offers a unique set of advantages, particularly for speed and convenience.
Personal Blender:
- Pros: Incredibly fast, requires minimal cleanup (usually just the cup and blade), perfect for small portions, requires no special skills.
- Cons: Volume might be less than a stand mixer, risk of over-blending is higher due to short, powerful bursts, less control over the exact texture beyond pulsing.
Stand Mixer:
- Pros: Can produce the largest volume of whipped cream, excellent control over speeds and textures, very stable peaks achievable, ideal for large batches or intricate piping.
- Cons: Requires a larger appliance, more extensive cleanup, takes longer from start to finish.
Hand Mixer:
- Pros: Good for small to medium batches, more portable than a stand mixer, offers decent control over speed.
- Cons: Can be tiring to hold for extended periods, requires bowls and can be messier than a personal blender, takes longer than a personal blender.
Whisking by Hand:
- Pros: Requires no special equipment beyond a bowl and a whisk, can create delicate textures if done skillfully, good for small amounts.
- Cons: Extremely time-consuming and physically demanding, very prone to user error leading to under or over-whipping, achieves the least volume.
For anyone who finds themselves needing a dollop of whipped cream now for an ice cream sundae, a partial pie, or just a spontaneous treat, the personal blender is a game-changer. It truly excels at delivering instant gratification. It’s about making dessert more accessible.
Serving and Storing Your Personal Blender Whipped Cream
Once you’ve mastered how to make whipped cream in a personal blender, you’ll want to make sure you serve and store it properly to enjoy it at its best.
Serving:
The glorious thing about fresh, homemade whipped cream is its unparalleled flavor and texture, which is best when served immediately. It’s the perfect topping for:
- Fresh berries and fruit salads
- Pies (apple, pumpkin, pecan, cherry)
- Cakes and cupcakes
- Brownies and other baked goods
- Hot chocolate and coffee drinks
- On its own, as a light dessert!
When serving, you can spoon it directly from the blender cup or transfer it to a nice serving bowl. For a more elegant presentation, use a piping bag with a star tip if you’ve achieved firm peaks.
Storing:
Homemade whipped cream is delicate and doesn’t contain the stabilizers found in most commercial versions. Therefore, its shelf life is shorter.
- Refrigeration: Transfer any leftover whipped cream to an airtight container and store it in the refrigerator. It’s best consumed within 24, 48 hours. The longer it sits, the more it will deflate and release liquid.
- Reviving Deflated Cream: If your whipped cream has started to deflate or weep, don’t despair entirely! You can often revive it. Gently whisk it by hand or give it a very, very brief pulse in the personal blender with a tablespoon of cold cream. This can help re-aerate it. Be extremely careful not to overdo this, or you’ll risk turning it into butter again.
- Freezing: While it’s possible to freeze whipped cream, the texture often changes upon thawing, becoming a bit watery or grainy. If you choose to freeze it, place dollops on a parchment-lined baking sheet and freeze until solid, then transfer to an airtight container. Thaw in the refrigerator. It’s generally much better to make smaller batches more frequently, as the process is so quick.
Honestly, the best way to enjoy homemade whipped cream is fresh. Since learning how to make whipped cream in a personal blender is so fast, making a fresh batch whenever you need it is often the most practical and delicious approach.
Safety First: Using Your Personal Blender Responsibly
When you’re diving into how to make whipped cream in a personal blender, safety is paramount. These appliances, while convenient, are still powerful tools.
- Read the Manual: Before using your personal blender for any task, always familiarize yourself with the manufacturer’s instructions. This is especially important for understanding its specific blending capabilities and limitations.
- Secure the Blade Assembly: This is non-negotiable. Ensure the blade assembly is completely and securely tightened onto the blender cup before blending. A loose blade can lead to leaks, a messy kitchen, and potential injury.
- Don’t Overfill: Personal blenders are designed for specific capacities. Overfilling can strain the motor, cause leaks, and prevent the ingredients from blending properly. Stick to the recommended fill lines.
- Pulse, Don’t Continuous Blend (for Whipped Cream): As we’ve discussed, for whipped cream, short pulses are key. Continuous blending for too long can overheat the motor and, more importantly for whipped cream, will over-process the cream rapidly.
- Keep Fingers Away: Never attempt to touch the blades while the blender is plugged in or assembled. Keep your fingers, utensils, and any other objects clear of the blade area when operating.
- Unplug When Assembling/Disassembling: Always ensure the blender is unplugged from the power outlet before you attach or remove the blade assembly, or before cleaning.
- Motor Overheating: Personal blenders are designed for short bursts of operation. If you notice the motor becoming excessively hot, or if it emits a burning smell, stop immediately, unplug the unit, and let it cool down completely before attempting to use it again. If the problem persists, contact the manufacturer. This is less common when making whipped cream due to the short blending times, but it’s good practice to be aware of.
- Cleanliness: Ensure both the blender cup and blade assembly are thoroughly cleaned after each use. Accumulated residue can harbor bacteria and affect the taste and safety of your food. Most personal blender cups and blades are top-rack dishwasher safe, but always check your manual.
By following these simple safety guidelines, you can confidently master how to make whipped cream in a personal blender and enjoy your delicious creation without any worries.
Frequently Asked Questions About Personal Blender Whipped Cream
Q1: Can I use almond milk or oat milk to make whipped cream in my personal blender?
A1: Not in the traditional sense. Plant-based milks don’t have the high fat content needed to create stable whipped cream. You would need to use a product specifically designed as a “whipping cream” alternative, like a coconut cream or a dedicated vegan whipping cream.
These often require specific preparation methods, so check the product packaging for instructions.
Q2: How much whipped cream can I realistically make in a personal blender?
A2: Most personal blender cups hold around 15, 20 ounces. You can typically make up to 1, 2 cups of whipped cream at a time, depending on the size of your cup and the amount of expansion you achieve. It’s best to work in batches if you need a larger quantity.
Q3: My personal blender doesn’t have a “pulse” function, just an on/off switch. What should I do?
A3: If your blender only has an on/off switch, you’ll need to be extremely quick. Turn the blender on for just a second or two, then immediately turn it off. Repeat this process, checking the cream’s consistency very frequently.
It’s more challenging to control, so watch it like a hawk to avoid turning it into butter.
Q4: Can I make sugar-free whipped cream in my personal blender?
A4: Yes, absolutely! You can swap out the granulated or powdered sugar for your preferred sugar-free sweetener. Options include erythritol, xylitol (be cautious if you have pets, as it’s toxic to dogs), or stevia.
Start with a small amount of liquid sweetener or a measured amount of granular sweetener and adjust to taste. Ensure liquid sweeteners are well-incorporated.
Q5: How long does it take to make whipped cream in a personal blender?
A5: The actual blending time is incredibly short, often less than a minute of total blend time, spread across several short pulses. Including gathering ingredients and chilling, you can have fresh whipped cream in under 10 minutes. It’s truly one of the fastest ways to achieve this delightful treat.
Q6: Is it better to use a glass or plastic personal blender cup for whipped cream?
A6: Both glass and plastic cups can work perfectly fine. The crucial factor is that the cup is thoroughly chilled beforehand, regardless of the material. Some people find glass cups retain coldness slightly better, but a well-chilled plastic cup will also yield excellent results when learning how to make whipped cream in a personal blender.
The Final Word on Personal Blender Whipped Cream Excellence
Mastering how to make whipped cream in a personal blender isn’t just about convenience; it’s about unlocking a world of freshly made, delicious toppings for all your favorite desserts. You don’t need fancy equipment or a culinary degree to achieve perfect peaks. With just a few simple ingredients and a few moments of your time, your personal blender can transform humble cream into a cloud of sweetness.
Remember the golden rules: always use cold, high-fat cream, chill your blender components, and control the blending process with short, attentive pulses. By following these steps, you’ll consistently create wonderfully light and fluffy whipped cream, ready to elevate any treat. So go ahead, experiment with flavors, and enjoy the sheer delight of homemade whipped cream made effortlessly in your personal blender.
It’s a small kitchen trick that delivers big on flavor and satisfaction.

Table of Contents