Shut off power, match wires by color, connect, mount sconce, test safely.
If you want a clean, pro finish, you need more than luck. I have wired many lights in old and new homes. Here is how to wire a wall sconce with safe steps, code-aware tips, and real tricks from the field. Follow along to avoid shorts, guesswork, and stress. You will learn how to wire a wall sconce like a seasoned DIYer.
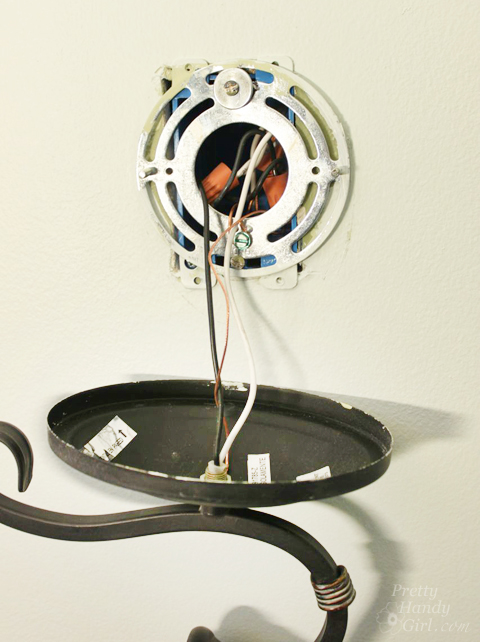
Source: prettyhandygirl.com
Safety, permits, and planning
Start with the breaker off. Lock it out if you can. Use a non-contact tester on every wire. Test again after you flip the switch off. No power means no shock.
Check local code. Some places need a permit. Hallways in rentals have stricter rules. In many areas, a licensed electrician is required for new circuits. Replacing a light is often fine for DIY, but new wiring may not be.
Plan the light layout. Note the stud bay, wire paths, and switch location. Confirm the sconce’s “electrical box required” note. Pick a box rated for lighting. Choose a dimmer that matches LED or incandescent.
If you are unsure about any step, stop. Call a pro. Knowing when to pause is part of how to wire a wall sconce the right way.
:max_bytes(150000):strip_icc()/SPR-how-to-install-wall-sconce-5221961-hero_30492-12c22a89fdd24daca4008e9ae2219d59.jpg)
Source: thespruce.com
Tools and materials you need
Gather these before you start. A calm setup leads to clean work.
- Non-contact voltage tester and a multimeter for live checks
- Screwdrivers, wire stripper, needle-nose pliers, and side cutters
- Drill, spade or hole saw, and a level
- Electrical boxes: old-work box or fan/light-rated box if heavy
- Cable: 14/2 for 15A or 12/2 for 20A circuits, with ground
- Wire connectors: UL-listed twist-on or push-in connectors
- Ground screw or clip for metal boxes
- Electrical tape and fish tape
- Stud finder and measuring tape
- The sconce, bulbs, and matching dimmer or switch
Keep a small drop cloth for dust. Label wires as you go. It makes how to wire a wall sconce much less stressful.

Source: youtube.com
Understand your wires and circuit basics
Know the colors. In most US homes, black is hot. Red is also hot or a switched leg. White is neutral. Green or bare is ground. In metal conduit systems, colors can vary.
In older homes, you may find cloth-sheathed cable and no ground. You should run new cable with a ground. Avoid using the neutral as a ground. That is unsafe and not to code.
Use a tester. Verify which wire is hot with power on, then turn it off. Tag the hot with tape. This small step is key when you plan how to wire a wall sconce with a switch loop or a 3-way.
Quick check Q&A:
- Can I tie two neutrals with a wirenut? Yes, if the connector is rated. Leave no copper exposed.
- Do I need a ground in a plastic box? Yes. Bond the sconce’s ground to the circuit ground.

Source: reddit.com
Pick your power source and box location
There are two common cases for how to wire a wall sconce.
- Replace an old sconce at an existing box. This is a straight swap.
- Add a new sconce. You will tap an existing circuit, run cable, and install a new box.
Use a listed old-work box if you cut into drywall. Support the box. Heavy sconces need a stronger box or a brace. Keep cable protected. Drill through the center of studs. Use nail plates where needed.
Check box fill. Each conductor counts toward fill. Use a box big enough for all wires, the device, and pigtails. Crowded boxes overheat and are a code issue.
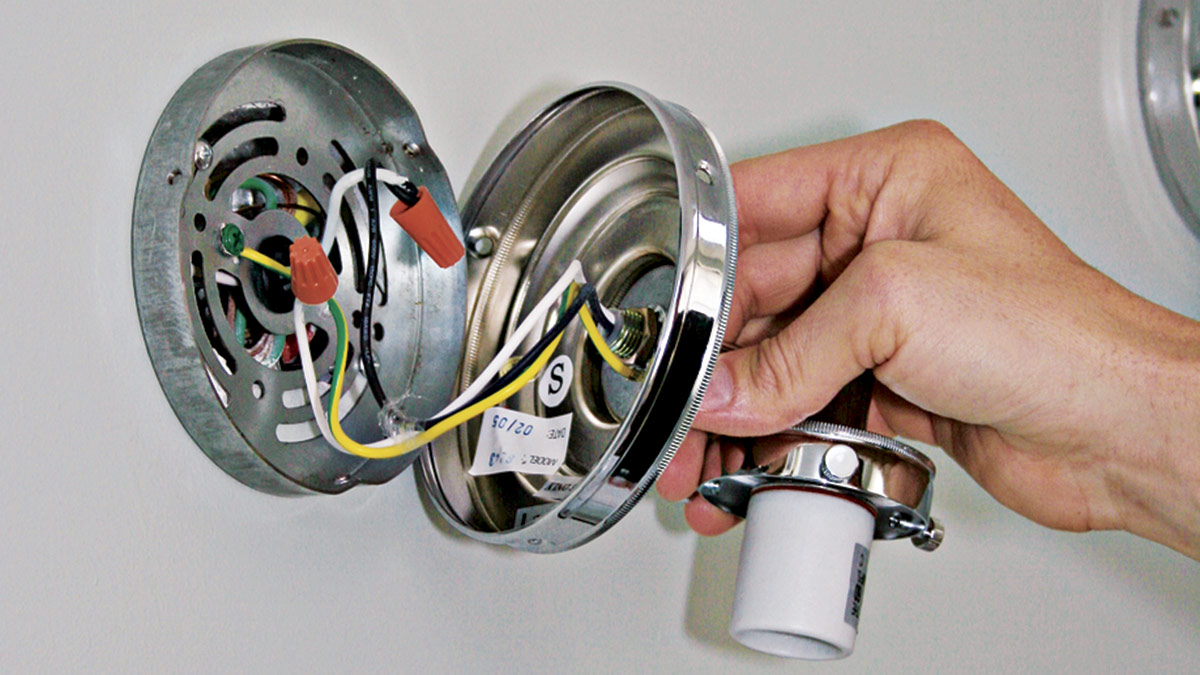
Source: finehomebuilding.com
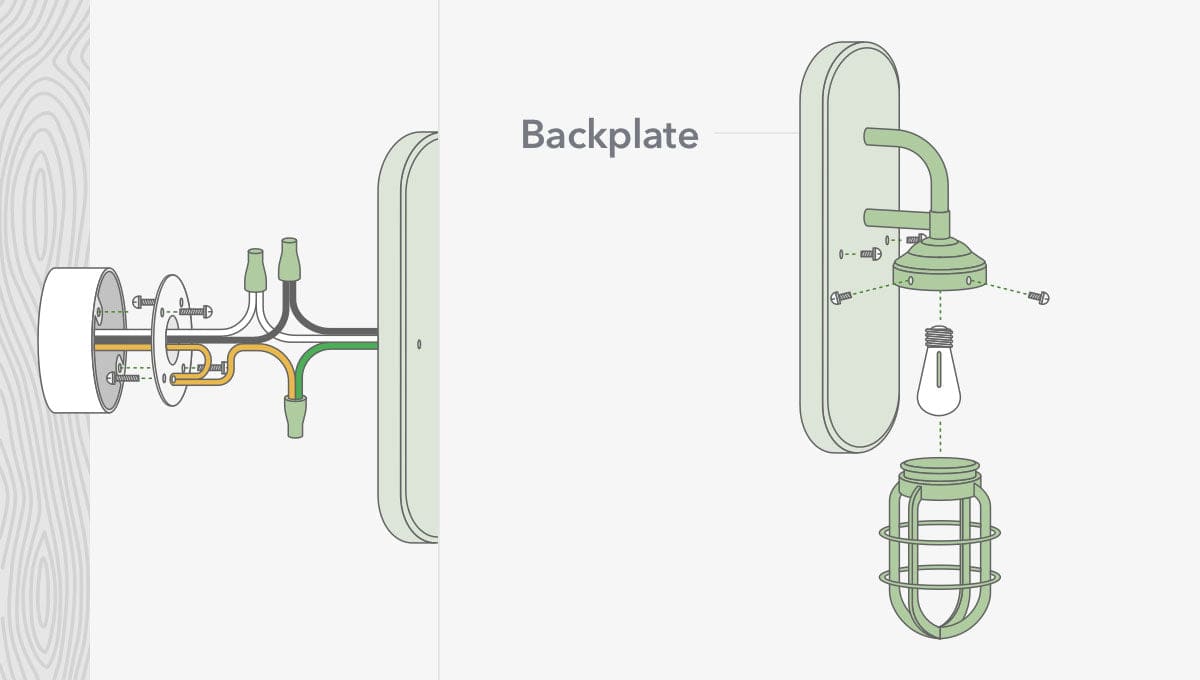
Step-by-step: how to wire a wall sconce
Follow these steps for a clean, safe job. I use this flow on every install.
- Kill power and verify
- Turn off the breaker. Tag it if others are home.
- Test every wire in the box. No beeps means safe to proceed.
- Prep the box and bracket
- Remove the old fixture if present. Support it as you loosen.
- Check the box is tight. Tighten mounting screws.
- Attach the new mounting bracket per the sconce manual. Keep it level.
- Make your connections
- Strip insulation about 1/2 to 3/4 inch. Do not nick copper.
- Connect ground first. Bond fixture ground to circuit ground. If using a metal box, add a ground screw to bond the box.
- Connect neutrals. White from fixture to white in box.
- Connect hots. Black from fixture to the switched hot (often black or red) from the switch.
- Use listed connectors. Twist clockwise and tug-test each splice. No bare copper should show.
- If adding a new sconce with a new switch
- Run cable from the power source to the switch box, then to the sconce box.
- At the switch box, tie the feed hot to one switch terminal. The other switch terminal goes to the sconce hot.
- Tie all neutrals together and cap. Do not land a neutral on a standard switch.
- Tie all grounds together and bond to boxes and devices with pigtails.
- Tuck and mount
- Fold wires neatly into the box. Keep grounds at the back.
- Mount the sconce base to the bracket. Do not pinch wires.
- Install the shade and bulb. Confirm bulb type and wattage.
- Power on and test
- Restore the breaker. Flip the switch. Check for steady light.
- Test the dimmer range if used. No flicker should occur. If it flickers, use a dimmer made for your LED bulbs.
Pro tip from the field: When I wire a sconce over a stair landing, I pre-bend a gentle “S” in the leads. It lets the base sit flat and keeps strain off the connectors. This speeds up how to wire a wall sconce and avoids stripped screws.
:max_bytes(150000):strip_icc()/SPR-install-a-wall-light-fixture-1824654-step-06_30249-28d8f331c7fd4744bf44ab44feb5289a.jpg)
Source: thespruce.com
Testing, troubleshooting, and safety checks
If the light does not work, do these checks.
- Test the hot to neutral with a multimeter. You should read about 120V AC.
- If no power, check the breaker, GFCI, or AFCI. Some trips are silent.
- If the light is on but the switch does nothing, your hot and switched hot may be tied wrong. Recheck the switch box.
- If the metal parts feel “tingly,” stop. You may have a missing ground or reversed neutral. Fix at once.
Do a final check. Confirm all screws are snug and covers are on. Label the breaker. That is part of how to wire a wall sconce with care.
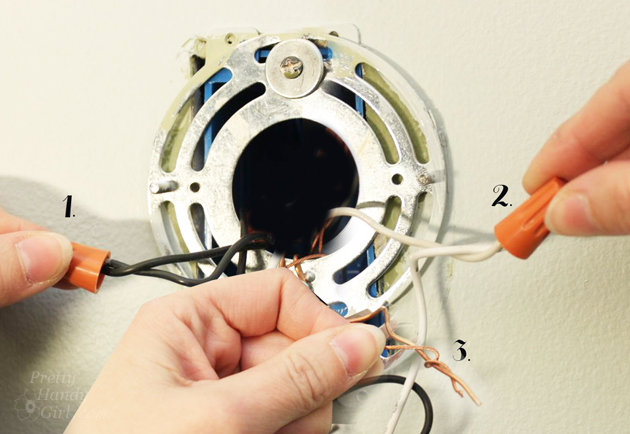
Source: prettyhandygirl.com
Common mistakes and pro tips to avoid them
I see these errors a lot. They are easy to prevent.
- Leaving 1 inch of bare copper outside a wirenut. Trim and re-cap. Bare copper can short to the box.
- Mixing 12 AWG and 14 AWG on a 20A circuit. Use the right gauge for the breaker.
- Forgetting the bond screw in a metal box. Always bond metal parts.
- Mounting to drywall alone. Use a box or brace. Sconces are not picture frames.
- Using a random dimmer with LED bulbs. Match dimmer and bulbs for smooth dimming.
From my own jobs: The most annoying fix is a switch loop miswire in old homes. If the white is used as a hot, re-mark it with black tape. This clear mark helps the next person who tries how to wire a wall sconce in that box.
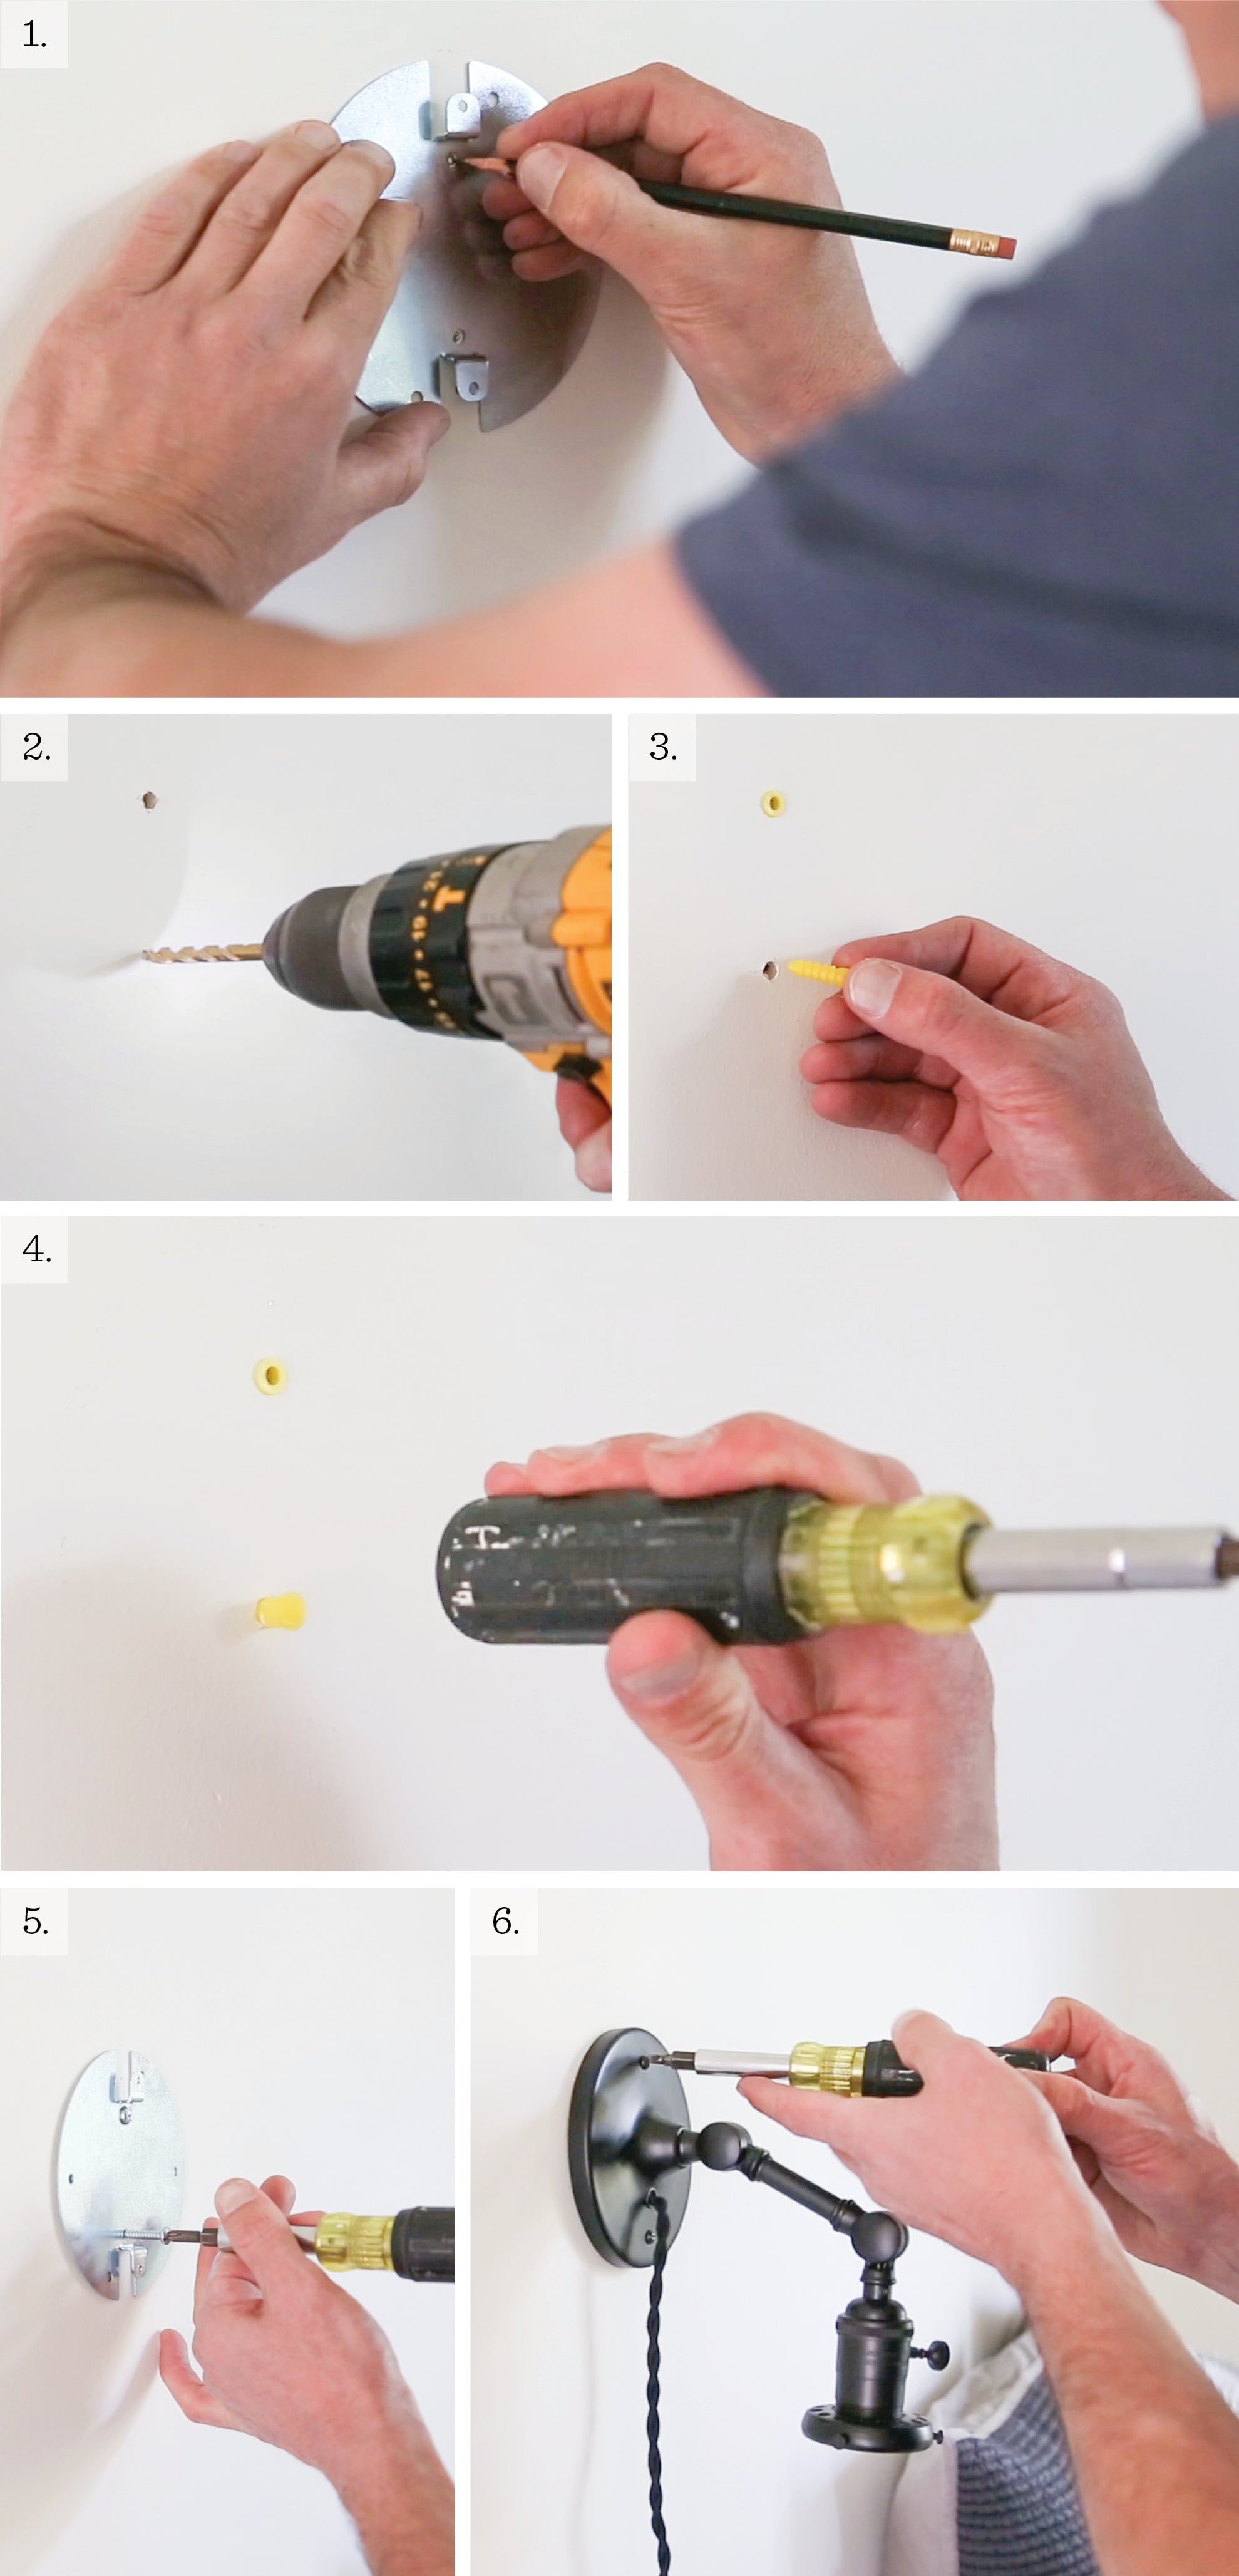
Source: schoolhouse.com
Design, height, spacing, and dimming
Good wiring is step one. Good placement is step two.
- Height: Place the center of the sconce about 60 to 66 inches from the floor in living areas.
- Bathroom mirrors: Mount sconces at eye level, about 60 to 65 inches to center, 36 to 40 inches apart.
- Hallways: Space about 6 to 8 feet apart. Watch ADA rules in tight halls. Choose shallow fixtures.
- Dimmers: Use LED-rated, forward or reverse phase as needed. Check the bulb’s dimmer list.
- Bulbs: 2700K for warm rooms, 3000K for clean bright, CRI 90+ for true color.
These choices make how to wire a wall sconce pay off with light that flatters the room.
Source: hunterfan.com
Maintenance, upgrades, and smart control
Keep it clean. Dust blocks light and traps heat. Wipe the shade and base with a dry cloth.
Use the right bulbs. Stay under the max wattage on the label. For LEDs, use damp-rated bulbs in baths. Use enclosed-rated bulbs if the shade is sealed.
Think ahead. Smart switches, motion sensors, or a tiny in-box smart module can add scenes and timers. When you plan how to wire a wall sconce, leave extra box space for future upgrades.
Frequently Asked Questions of how to wire a wall sconce
Can I wire a wall sconce without a ground?
A ground is required for safety. If your cable has no ground, run new cable with ground or use a permitted retrofit method.
What size wire do I need for a wall sconce?
Use 14/2 with ground on a 15A circuit. Use 12/2 with ground on a 20A circuit.
Do I need a junction box behind the sconce?
Yes. Every hardwired sconce must land in a listed electrical box. Never hide splices in the wall.
Can I put two sconces on one switch?
Yes. Tie the two switched hots together and the two neutrals together in a box sized for the fill. Keep all grounds bonded.
Why does my LED sconce flicker on a dimmer?
The dimmer and bulb may not be compatible. Use an LED-rated dimmer and bulbs from the same compatibility list.
How high should I hang sconces next to a mirror?
Place the center near eye level, about 60 to 65 inches from the floor. Keep 36 to 40 inches between sconces when possible.
Is it legal to add a new sconce myself?
It depends on local code. Many places allow fixture replacement but require a permit or a licensed electrician for new wiring.
Conclusion
You now know how to wire a wall sconce from plan to polish. Kill power, secure the box, bond grounds, match wires, and test. Place it at a smart height and pair it with the right dimmer for clean light that works every day.
Ready to upgrade a hallway, bath, or bedside? Start with one sconce and follow these steps. If you hit a snag, get help, learn from it, and try again. Share your project wins or questions in the comments, and subscribe for more hands-on guides.

Table of Contents