Shut off power, mount the bracket, connect wires, attach sconce, test carefully.
If you want a clean, designer look without a big budget, learning how to install wall sconce is a smart move. I have installed dozens across bathrooms, halls, and bedrooms. In this guide, I will walk you through how to install wall sconce the right way, with simple steps, safety tips, and pro tricks that save time and stress.
Source: schoolhouse.com
Tools and materials for how to install wall sconce
You do not need a full shop to learn how to install wall sconce. A few common tools and a calm plan will do the job.
Tools
- Non-contact voltage tester
- Screwdrivers
- Wire stripper and cutter
- Pliers
- Drill and bits
- Level and tape measure
- Stud finder
- Utility knife
Materials
- Wall sconce and bulbs
- Mounting bracket and screws
- Wire connectors
- Electrical tape
- Old-work electrical box if you add a box
- Drywall anchors if needed
- Paint and patch if you open the wall
Tip from the field: Keep a small tray for screws and wire nuts. It stops parts from rolling away.
:max_bytes(150000):strip_icc()/SPR-how-to-install-wall-sconce-5221961-hero_30492-12c22a89fdd24daca4008e9ae2219d59.jpg)
Source: thespruce.com
Safety and code basics for how to install wall sconce
Safety comes first. Always turn off power at the breaker and test the wires. Do not trust the switch. Use a non-contact tester every time before you touch a wire.
Work to local code rules. Many places follow a national code for wire colors, box fill, and support. Use a listed box that can hold the weight of the sconce. If you are unsure about any step, it is wise to hire a licensed electrician.
Two quick checks
- Box support rating: heavy sconces need solid support on a stud or a rated anchor.
- Grounding: connect the green or bare wire to the box or ground screw on the bracket.
Source: reddit.com
Plan your layout and height
Good layout makes lights feel built-in. Here is how I place most sconces.
Standard heights
- Living room and hall: 60 to 66 inches to the center of the sconce.
- Beside a mirror: 65 to 70 inches to the center, 28 to 36 inches apart.
- Stair walls: keep the bottom of the sconce above the handrail.
Spacing rules of thumb
- Hallways: one sconce every 8 to 10 feet.
- Bedrooms: center the sconce 6 to 12 inches above the top of the headboard.
Light type matters. Opaque shades give a cozy glow. Glass shades throw more light. Check the shade depth in tight halls. For tight spaces, look for low-profile models that meet the 4-inch rule in narrow paths.
I mark the wall with painter’s tape to try height and spacing before I drill.
Quick answers while you plan
- Do I center the sconce on the stud or the space? Center it on the space. Use anchors or an old-work box if no stud is in the right spot.
- Which way should the shade face? Up for ambient light. Down for task light or to avoid ceiling shadows.
- Will it dim? Yes, if the switch and bulbs match. Use dimmable LEDs and a compatible dimmer.
:max_bytes(150000):strip_icc()/SPR-how-to-install-wall-sconce-5221961-step-15_30497-6fd14b43e65d45d9b69b3d9461136e24.jpg)
Source: thespruce.com
Step-by-step: how to install wall sconce (hardwired)
This is the most common path for how to install wall sconce when a junction box already exists.
- Turn off power
- Turn off the breaker.
- Flip the wall switch on and confirm the light stays off.
- Use a tester at the box to verify no power.
- Remove old fixture or blank cover
- Support the old fixture with one hand.
- Unscrew the canopy and detach wire nuts.
- Separate black, white, and ground wires.
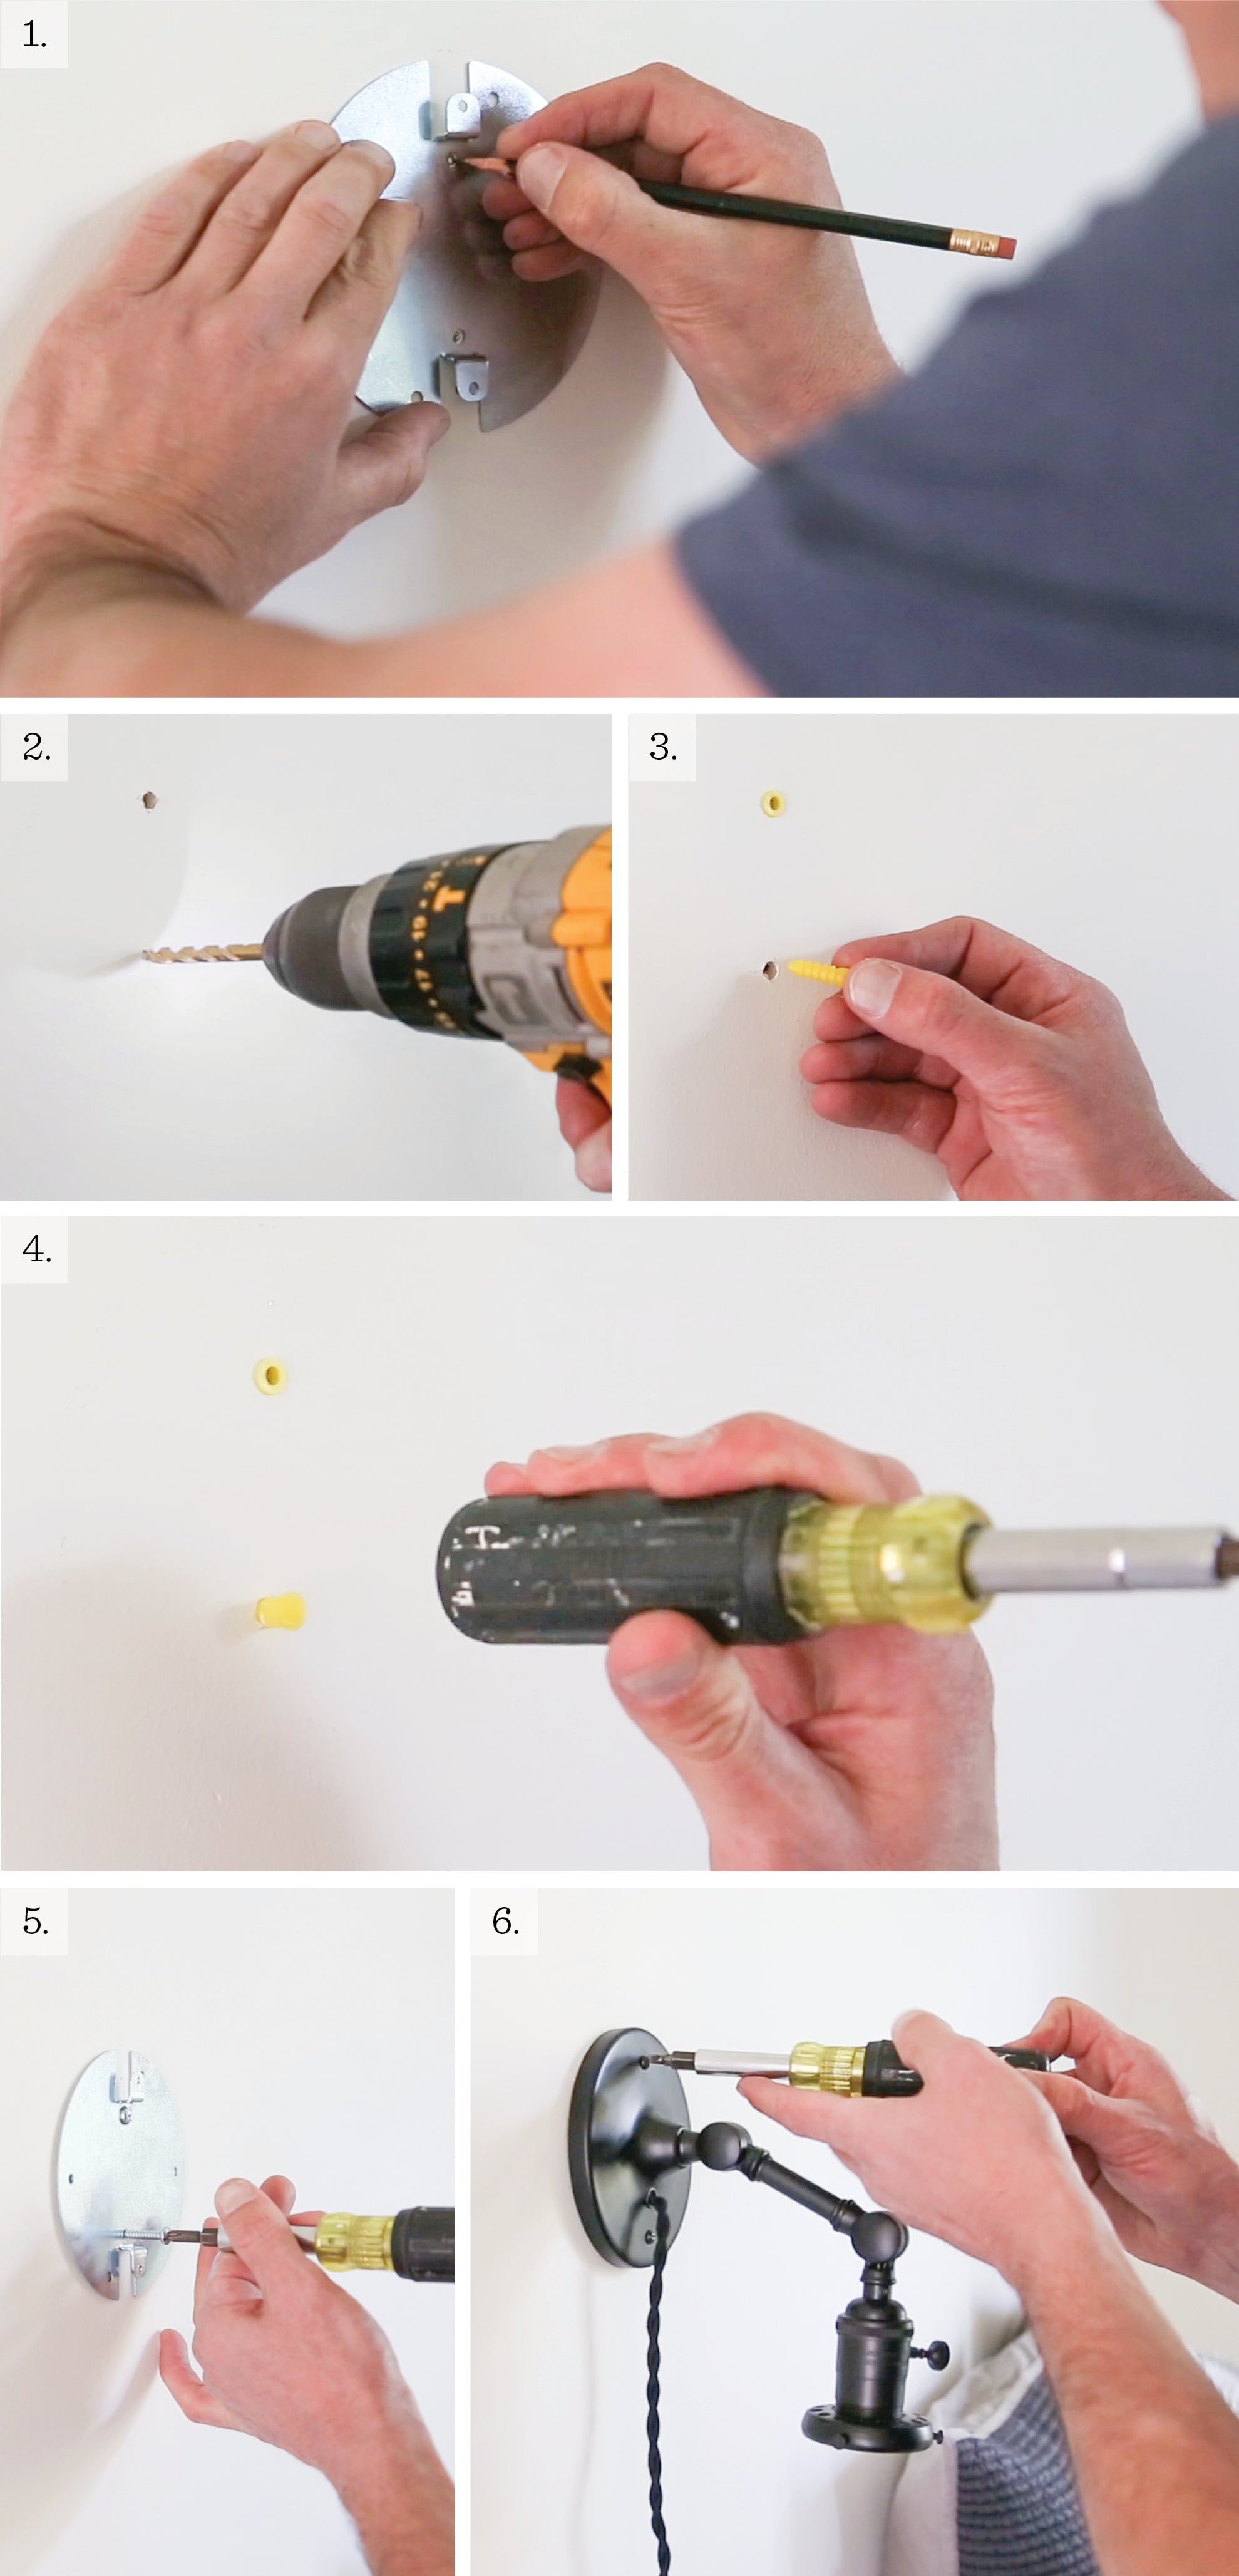
- Prep the box and bracket
- Check the box for cracks and tight screws.
- Pull wires 6 inches out for easy work.
- Attach the new mounting bracket to the box. Keep it level.
- Connect the wires
- Match colors: black to black (hot), white to white (neutral), green or bare to ground.
- Twist wires clockwise with wire connectors.
- Tug each wire to confirm a snug fit.
- If the metal box is used as ground, attach the ground to the box’s green screw too.
- Mount the sconce
- Tuck wires gently into the box. Do not pinch them.
- Place the fixture base on the bracket.
- Install the canopy screws. Snug them, then level the sconce.
- Install bulbs and shade
- Use bulbs within the listed wattage limit.
- For LEDs, pick the color temp you want. I like 2700K for warm rooms and 3000K for baths.
- Restore power and test
- Turn the breaker on.
- Test the switch and dimmer if used.
- Check for flicker, hum, or heat after 10 minutes.
If there is no box in the wall, cut in an old-work box rated for fixtures and pull a code-compliant cable to it. This may need a permit and skill. If you do not have experience with new cable runs, hire a pro for this part.

Source: youtube.com
No existing box? Options to install a wall sconce
There are safe and clean options if you want the look now.
Plug-in sconce
- Easiest way to learn how to install wall sconce without opening walls.
- Mount to the wall with anchors and plug into a nearby outlet.
- Use cord covers or paintable raceways for a neat line.
Surface raceway system
- A good middle ground for how to install wall sconce in rentals or finished spaces.
- Use listed surface raceway to bring power from a junction box to the new sconce.
- Follow kit instructions for adhesive, screws, and corners. Keep it level.
New hardwired box
- Best long-term choice for a clean look.
- Run new cable from a circuit or a nearby box. Staple and protect as required.
- This path often calls for a permit and an electrician.
:max_bytes(150000):strip_icc()/SPR-install-a-wall-light-fixture-1824654-hero_30261-1353b10ee7224533bf9051b8bf703b85.jpg)
Source: thespruce.com
Bathrooms, hallways, and stairs: special tips
Bathrooms
- By a mirror, sconces at face height give even, no-shadow light.
- Keep fixtures out of wet zones. Use damp-rated fixtures near steam.
- If there is a built-in night light or outlet on the sconce, follow rules for GFCI where needed.
Hallways
- ADA depth matters in narrow halls. Choose low-profile sconces.
- Space lights for even light. Overlap beams to avoid dark gaps.
Stairs
- Place sconces where you can see each tread.
- Keep the bottom edge above the handrail. Leave room for moving large items.

Source: youtube.com
Troubleshooting and testing
If the light does not turn on
- Check the breaker, switch, and bulb first.
- Confirm wire connections are tight and matched.
If the light flickers
- Try a new bulb.
- If on a dimmer, use a dimmable bulb and a listed dimmer. Many LED issues come from mismatch.
If a breaker trips
- Turn it off and recheck all connections.
- Look for stray wire strands or nicked insulation.
If metal parts shock or tingle
- Power off right away.
- Check the ground connection at the bracket and box.
Document what you do. I snap quick photos before and after. It helps if you need support later.
:max_bytes(150000):strip_icc()/SPR-install-a-wall-light-fixture-1824654-step-06_30249-28d8f331c7fd4744bf44ab44feb5289a.jpg)
Source: thespruce.com
Maintenance, bulbs, and dimmers
Good care keeps your sconce safe and bright.
Bulbs
- Use the watt cap listed on the fixture.
- Choose LED bulbs for cool operation and long life.
Dimmers
- Pick a dimmer that matches your bulb type.
- Many brands list tested bulb and dimmer pairs. It cuts flicker.
Cleaning
- Turn off power at the switch.
- Dust shades often. Wash glass with mild soap and water. Dry fully.
Upgrades
- Smart bulbs or smart switches add scenes and voice control.
- Warm-dim LEDs shift from bright white to warm amber at low levels. Great for bedrooms.

Source: thesouthernsource.com
Common mistakes and pro tips from the field
Mistakes to avoid
- Skipping the power test. Always test, even if the switch is off.
- Mixing up wires. Black is hot, white is neutral, green or bare is ground.
- Overstuffing boxes. Use a box with enough capacity for all wires and connectors.
- Using the wrong anchors. Heavy sconces need solid backing, not flimsy anchors.
Pro tips
- Dry-fit the sconce base before you wire it. It saves time.
- If the shade must face a certain way, set the bracket so the final screws are level when tight.
- Use painter’s tape to hold the canopy while you start the first screw.
- Note bulb base type and color temp on a label inside the canopy for easy reorders.
From my installs, the cleanest results come from slow, neat work. Lay out all parts, plan wire routing, and double-check level before you tighten.
Frequently Asked Questions of how to install wall sconce
Do I need an electrician to install a wall sconce?
If you have an existing box and basic skills, many DIYers can do it. If you need to run new cable or are unsure, hire a licensed electrician.
What height should a wall sconce be?
Most look best with the center at 60 to 66 inches above the floor. At a mirror, place them near eye level to cut shadows.
Can I install a wall sconce without a junction box?
Use a plug-in sconce or a listed surface raceway kit. For a hardwired look, add an old-work box and feed it per code.
Which wire goes where on a sconce?
Black connects to black (hot), white to white (neutral), and green or bare to ground. Always turn off power and test first.
Will any dimmer work with LED sconce bulbs?
No. Use a dimmer rated for LEDs and bulbs that say dimmable. Check for a tested pairing to avoid flicker.
Conclusion
You now know how to install wall sconce from plan to polish. With safe steps, good layout, and neat wiring, you will get a pro look in a single afternoon. Start with one room, learn your style, and then light the rest of your home with confidence.
Ready to try your first install? Pick a spot, gather your tools, and follow the steps. If you found this helpful, subscribe for more DIY guides, or drop a comment with your project wins and questions.

Table of Contents