If you’ve ever stood in front of a forge with a pair of pliers that just won’t hold, you already know why learning how to make homemade tongs is worth the afternoon. Store-bought tongs are expensive, and the cheap ones slip on hot steel when you need them most. A single pair of well-made tongs changes everything about working at the anvil.
Blacksmithing standards from ABANA (Artist-Blacksmith’s Association of North America) indicate that a properly forged rivet joint should hold up to 200 pounds of pull without failure. That’s the kind of reliability you want when you’re holding a 1600°F piece of steel. Let’s walk through what actually goes into making tongs that work.
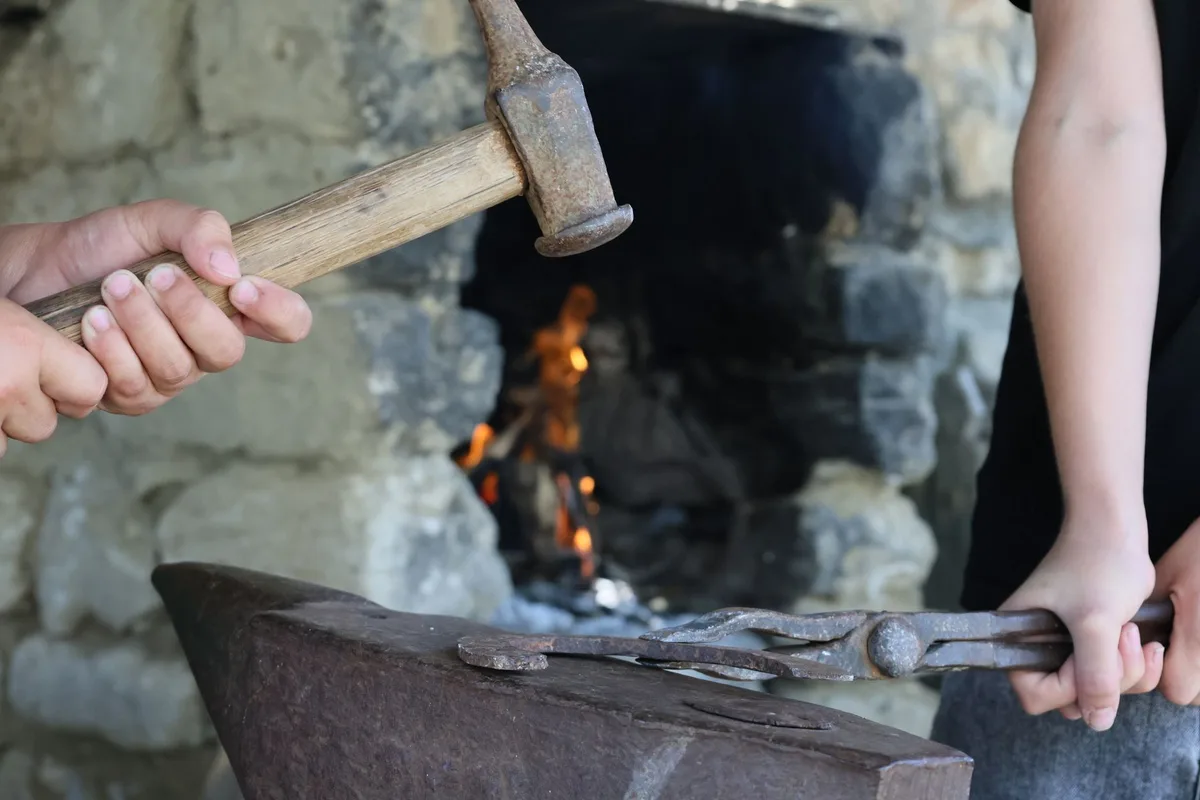
Why Visuals Matter for Making Homemade Tongs
A written description of forging tongs gets you about halfway there. The other half lives in what you see. The color of the steel, the angle of the jaw, the shape of a properly peened rivet head.
These are things you need to recognize with your eyes, not just read about.
What photos and diagrams solve that text alone can’t
When you’re heating a piece of 3/8-inch round bar, you’re watching for orange. Not pale yellow (too hot, steel is burning). Not dull red (too cold, you’re just bending metal).
Bright orange, the color of a pumpkin right off the vine. That’s your working temperature for forging mild steel, roughly 1600°F to 2000°F. A photo of that exact color range saves paragraphs of description.
The same goes for rivet placement. You can read “center punch the hole one-third of the way from the jaw tip” and still get it wrong. But one good diagram showing exactly where that mark goes relative to the jaw curve, and you’re drilling in the right spot on your first try.
The three critical visual checkpoints
There are three moments in the process where you absolutely must see what you’re doing to get it right.
First is the jaw alignment. Your two tong halves need to meet perfectly when closed. If one jaw sits higher or lower, your tongs will rock on the work piece instead of gripping it.
You check this by closing the jaws on a straight rod and looking for a gap. No gap means you nailed it.
Second is the rivet fit. After peening, the rivet should be snug but not locked. The tongs should open and close smoothly with no side-to-side wobble.
If you can feel play when you shake the handles, the rivet is too loose. If the handles fight you, it’s too tight.
Third is the handle spread. When you open the tongs to their widest, your hand should fit comfortably between the reins. Too narrow and you’ll burn your fingers.
Too wide and you lose leverage. A photo of a hand gripping finished tongs shows you the target immediately.
Three critical visual checkpoints for tong making
| Checkpoint | What to look for | Common mistake |
|---|---|---|
| Jaw alignment | Even contact on both sides when closed | One jaw sits higher; tongs rock on the work |
| Rivet fit | Smooth open/close with no wobble | Too tight (stiff handles) or too loose (play) |
| Handle spread | Hand fits comfortably between reins | Too narrow (burns) or too wide (poor leverage) |
What You’ll Need: Tools and Materials
Before you light the forge, gather everything in one place. Running back to the bench with hot steel in your tongs is how burns happen.
Steel stock options: what to look for visually
The most common material for homemade tongs is mild steel. It’s forgiving, easy to forge, and available at any scrap yard. Look for 3/8-inch round bar for medium-duty tongs.
For heavier work, step up to 1/2-inch stock. Rebar works in a pinch, but it’s inconsistent. Some batches of rebar have high carbon content that cracks under the hammer.
Stick with known mild steel when you can.
What you want to see at the scrap yard is clean steel with no deep rust pitting. A bar that rings when you drop it on concrete is solid. One that thuds is likely cracked inside.
Flat bar is another good option. It gives you a natural flat jaw surface with less forging. The tradeoff is that flat bar requires more bending to get the jaw angle right.
Rivet choice: how to identify at the scrap yard
Your rivet should be mild steel, not hardened. Hardened steel (from coil springs or old tools) will crack when you try to peen it. Test this by striking the edge of the rivet stock with a hammer.
If it dents easily, it’s mild. If it rings and resists, it’s hard. Walk away from hard stock.
A 1/4-inch diameter rivet works for most tongs. Cut it about 1.5 times the thickness of your jaw material. For 3/8-inch jaw stock, that means a rivet about 9/16-inch long before peening.
That extra length gives you enough material to form the head on both sides.
Essential forge and anvil setup: visual cues for proper spacing
Your forge should be positioned so you can reach the anvil in two steps, no more. Hot steel cools fast. Every step you save is time you keep working the metal.
The anvil face should be roughly hip height. Too low and you’ll wreck your back hammering. Too high and you lose power in your swing.
Keep a bucket of water within arm’s reach of the forge. Not for quenching (that comes later). For dropping a piece that’s gone wrong or for burning scale that’s landed on your arm.
Cutting and drilling tools: what works and what doesn’t
| Tool | Works for | Doesn’t work for |
|---|---|---|
| Angle grinder with cut-off wheel | Clean cuts on round and flat bar | Rebar (wears wheels fast) |
| Hacksaw | Gradual cuts, no sparks | Heavy stock (takes forever) |
| Drill press with 1/4-inch bit | Precision rivet hole | Hardened steel (use cobalt bit) |
| Hand drill | Fine with pilot hole | Large bits without pilot (walking hazard) |
Step-by-Step Guide: Forging Your First Pair of Tongs
Let’s go through it start to finish. Take your time. Rushing hot steel is how you end up with tongs that look like a pretzel.
Step 1 — Heating and drawing out the reins (handles)
Heat your 3/8-inch round bar in the forge until it glows bright orange. Not white. Not yellow.
Orange. Pull it out and lay it on the anvil. Hammer the last four inches of the bar to taper it down to about half its original thickness.
This taper becomes the rein (handle) on one half of the tongs.
The visual cue here is the taper shape. It should be smooth and even, not lumpy. You want a gradual thinning from the pivot area down to the end of the handle.
Reheat as needed. One heat will get you about three hammer blows before the steel goes dull red.
How to avoid burning the steel: what the sparks tell you
If you see sparks flying off the steel in the forge, you’ve overheated it. That means the surface is burning and your tongs will have weak spots. Pull the steel out immediately and let it cool in air.
Don’t quench it. Rapid cooling can crack overheated steel.
Fold back the bar on itself to mark the pivot. This bend creates the “eye” where your rivet will go. Don’t close the eye completely yet.
You need to drill through it later, and a closed eye makes that much harder.
Step 2 — Shaping the jaw
Now you work the other end. Heat the bar again and hammer the last two inches into a flat taper. This becomes the jaw.
For a flat jaw (the simplest design), keep the taper wide and flat. About 1/8-inch thick at the tip works well.
Bend the jaw upward at a 90-degree angle. The bend should start about an inch back from the tip. Use the edge of your anvil to get a sharp inside corner.
A rounded corner makes the jaw weak at the bend point.
Flat jaw vs. V-bit vs. wolf-jaw: visual comparison
| Jaw type | Best for | Difficulty |
|---|---|---|
| Flat jaw | General stock, square bar | Easiest (first project) |
| V-bit | Round bar | Medium (requires file work) |
| Wolf-jaw | Square or flat stock | Harder (two-step forging) |
How to check symmetry using a straight edge
After you’ve shaped both halves, rest them on a flat surface with the jaws closed. Lay a straight edge across the top of both jaws. They should touch the straight edge evenly along their full length.
If one side lifts, reheat that jaw and tap it back into alignment.
Make the second half identical to the first. Don’t try to get clever with different lengths or angles. Matching halves give you a solid pivot and even grip.
Step 3 — Drilling the rivet hole
Center punch the pivot point on both halves. The hole goes about one-third of the way from the jaw tip to the handle end. Too close to the jaw and you lose leverage.
Too close to the handle and the tongs won’t open wide enough.
Drill a 1/4-inch hole through both halves at once. Stack them with the pivot points aligned and clamp them together. Drilling them separately guarantees misalignment.
Clamped together, you get one clean hole through both pieces.
Common error: hole too close to the jaw tip
If your rivet hole is less than a finger’s width from the jaw tip, the metal between the hole and the tip is too thin. It will bend or tear under heavy use. Move the hole back.
You can always grind away extra jaw length later if the tongs feel unbalanced.
Step 4 — Riveting and peening
This is where your tongs either lock together or fall apart. Cut your 1/4-inch mild steel rivet to length. Insert it through the aligned holes.
The rivet should stick out about 1/8 of an inch on both sides. That’s what you’ll hammer into the head.

Peening sequence: top, then bottom, then round
Start by hammering the top rivet head. Use the ball end of your hammer to mushroom the metal outward. Three or four solid strikes.
Flip the tongs and do the same on the bottom. Keep alternating until the rivet head is about 1.5 times wider than the shank.
Stop before the rivet locks the jaws tight. You need the tongs to open and close freely. The rivet should be snug but not binding.
If the handles don’t swing, you’ve peened too hard. Tap the rivet head lightly on the side to loosen it slightly.
Visual check: rivet head should be 1.5x the shank diameter
A properly formed rivet head looks like a small mushroom cap. Round and even on both sides. If one side is flat and the other is domed, you spent too much time on one side.
Alternate your strikes more evenly next time.
Step 5 — Final alignment and test grip
Close the jaws on a piece of 1/2-inch round bar. The jaws should make contact along their full length. If you see daylight between the jaw tips, the alignment is off.
Reheat the jaws and tap the high side down.
Closing the jaws on a rod: what perfect contact looks like
Perfect contact means the rod doesn’t move when you shake the tongs. It’s held firmly by even pressure across both jaws. If the rod rotates, your jaws are meeting at the tips only.
The pivot point needs adjustment.
Handle spread test: too wide or too narrow?
Open the tongs as wide as they’ll go. Your hand should slip between the reins with about a finger’s width of space on each side. Any narrower and you’ll burn your palm on hot work.
Any wider and you lose gripping power. Adjust by bending the reins at the pivot, not at the handles.
Common Visual Mistakes Beginners Make
You learn more from bad tongs than good ones. Everyone’s first pair has something wrong. Here’s what to watch for so yours don’t suffer the same fate.
Jaws that don’t meet evenly
The most common mistake. Your tong halves come out slightly twisted, and the jaws meet on one corner only. This happens when you don’t check symmetry during forging.
Fix it by reheating the bent half and twisting it back. Don’t try to cold bend tongs. You’ll stress the metal and create a weak spot.
Rivet set too loose or too tight
Too loose means the tongs wobble. Too tight means they won’t open. The sweet spot is a rivet that lets the handles swing with light finger pressure but has zero side-to-side play.
You can loosen a tight rivet by tapping the head sideways. You can tighten a loose one by peening a little more. But you only get one or two adjustments before the rivet work-hardens and breaks.
Handles that are too short: where burns happen
If your reins are under 10 inches long, your knuckles will be inside the forge zone. That’s a trip to the burn clinic. Standard tong handles run 14 to 18 inches for a reason.
That extra length keeps your hands away from the hot zone. Measure twice before cutting.
Forging scale left on the surface: why it causes slipping
When hot steel hits air, it forms a layer of iron oxide (scale). If you leave this on your tongs, it acts like ball bearings. The jaws slide off your work piece instead of gripping it.
Knock the scale off with a wire brush after forging. A clean surface grabs better every time.
Choosing Your Jaw Style: Which One to Make First
Start simple. You can always forge a second pair with a different jaw later. Your first pair should be flat jaw tongs.
They’re the easiest to make and the most forgiving of beginner mistakes.
Flat jaw: simplest, for general stock
Flat jaw tongs work on square, rectangular, and flat stock. They’re your general-purpose shop tongs. Make them first.
You’ll use them for 80 percent of your work. The jaw faces should be smooth but not polished. A little texture from the hammer helps with grip.
V-bit: better grip on round bar
Round bar slips in flat jaws. A V-bit solves this by creating a channel that cradles the round stock. To make one, file or grind a shallow V groove along the center of both jaws.
The V doesn’t need to be deep. Just enough to seat the round bar and prevent rolling.
Wolf-jaw: for holding square or flat stock securely
Wolf-jaw tongs have a notch cut out of one jaw and a corresponding bump on the other. They lock onto flat stock like a wolf’s teeth. They’re harder to forge than flat jaws because the notch requires precise filing.
Save these for your second or third pair.
Pick-up tongs: when you need to grab from the fire
Pick-up tongs have a different grip. Instead of pinching, they use a ring-and-pin setup that clamps tighter the more you pull. These are for grabbing hot steel out of the forge, not for holding it while hammering.
Make pick-up tongs third, after you have a solid flat jaw pair.
Safety While Forging and Using Homemade Tongs
Safety isn’t a checklist you glance at once. It’s a habit you build with every heat. Forging involves fire, hammer, and hot steel moving fast.
One mistake costs you skin.
Eye protection: real examples of sparks in eyes
Scale pops off hot steel without warning. A single flake of 1600°F scale in your eye means a trip to urgent care. Wear safety glasses with side shields.
Not sunglasses. Not your prescription glasses. Proper impact-rated eye protection costs under $10 and saves your vision.
Gloves and apron: what to wear and what to skip
Heavy leather gauntlets protect your forearms. They should fit snugly at the wrist. Loose gloves catch on the work and pull your hand into the forge.
Skip synthetic fabrics. Nylon and polyester melt onto skin. Wool, leather, and cotton are your friends.
A full leather apron stops hot scale from landing in your lap. It also catches the occasional dropped piece of steel. Without an apron, that piece lands on your jeans and burns through in seconds.
Fire extinguisher and bucket of water: where to place them
Your forge area needs a Class D fire extinguisher rated for metal fires. A regular ABC extinguisher won’t put out burning magnesium or steel. Place it between you and the exit so you don’t have to walk past a fire to grab it.
Keep a five-gallon bucket of water next to the forge. Drop hot steel in it, not on the floor. Hot steel on a wooden floor is a fire waiting to happen.
Hot rivet heads coming loose: how to test before use
A rivet that wasn’t peened properly can pop off on the first serious grip. Test your tongs cold before you ever put them in the forge. Grip a steel rod and shake it hard.
If the rivet shifts or the jaws wobble, re-peen before using them hot.
How to Test Your Homemade Tongs Before Serious Use
You wouldn’t drive a car without a test drive. Don’t trust a new pair of tongs without proving they work.
Cold test: grip a steel rod and shake
Take your finished tongs to the bench. Grip a 1/2-inch steel rod firmly. Shake it side to side, up and down.
The rod should stay locked in the jaws. If it rotates or slides, your jaw alignment is off or your rivet tension is wrong. Fix it now, not with hot steel in the grip.
Hot test: grab a piece of 1/2-inch round stock at forging temperature
Once the cold test passes, heat a scrap piece of 1/2-inch round bar to forging temperature. Grab it with your new tongs. Hold it steady for five seconds.
Lift it, move it, set it down. The tongs should hold solid with no slipping.
If the jaws chatter or the rod twists, they need adjustment. Mark the problem spot and go back to the anvil.
Longevity test: 10 cycles of heating and gripping
Test the tongs through ten full heat-cool cycles. Heat the test bar, grip it, hold it, set it down. Let the tongs cool between cycles.
After ten cycles, check the rivet. If it’s still tight with no play, your tongs are ready for real work.
Improving Your Tongs Over Time
Your first pair works. Now make them better. A few small upgrades turn functional tongs into tools you reach for every time.
Adding a spring temper to the reins
Some blacksmiths heat the reins to cherry red and quench them in oil. This gives the handles spring tension. The tongs open themselves when you relax your grip.
It’s a nice upgrade but not necessary for your first pair. Leave it for your second or third project.
Replacing a worn rivet
Rivets wear out after heavy use. Drive the old rivet out with a punch. Drill the hole clean and insert a new rivet.
Peen it the same way you did the first time. A fresh rivet makes old tongs feel like new.
Knurling the jaw face for better grip
If your tongs slip on smooth stock, add grip to the jaw face. Use a center punch to dimple the inside of both jaws. A grid of small divots catches the work piece and prevents rotation.
Five minutes of punching transforms a slipping jaw into a locking one.
Frequently Asked Questions
Can I make tongs without a forge?
You can make simple tongs from flat bar using a torch and a vise. A propane torch reaches about 2000°F, hot enough to bend 1/4-inch mild steel. The results won’t match forge-welded tongs, but they work for light duty use.
What if my rivet is too tight after peening?
Tap the rivet head sideways with a hammer. One or two light strikes on each side usually frees up the joint. If that doesn’t work, drill the rivet out and start again with a fresh one.
Why are my tongs twisting when I grab heavy stock?
Your jaws are too wide or your rivet is too loose. Narrow the jaw gap by bending the reins inward at the pivot. If the rivet has play, peen it a little more.
A tight pivot prevents twisting.
How do I make tongs from an old coil spring?
Coil spring steel is tough but brittle. You need to anneal it first by heating it to non-magnetic and cooling it slowly in ash or vermiculite. Then forge it like mild steel.
Hardened spring steel cracks under the hammer if you skip annealing.
Final Tips for Getting It Right the First Time
Start with a simple flat-jaw design. Take photos at each step for your own reference. Watch your heat.
Don’t rush the metal.
One rivet, one pair, one solid afternoon. That’s all it takes to make tongs that will outlast anything you can buy at a supply shop.

Table of Contents