Shut off water, swap the flapper, set chain slack, test and adjust.
Fixing a running toilet is fast, cheap, and simple. In this guide, I will show you how to fix a toilet flapper like a pro, with clear steps, photos-in-mind tips, and real fixes I use in homes every week. If you want a no-stress plan on how to fix a toilet flapper, you are in the right place.
What a toilet flapper does and why it fails
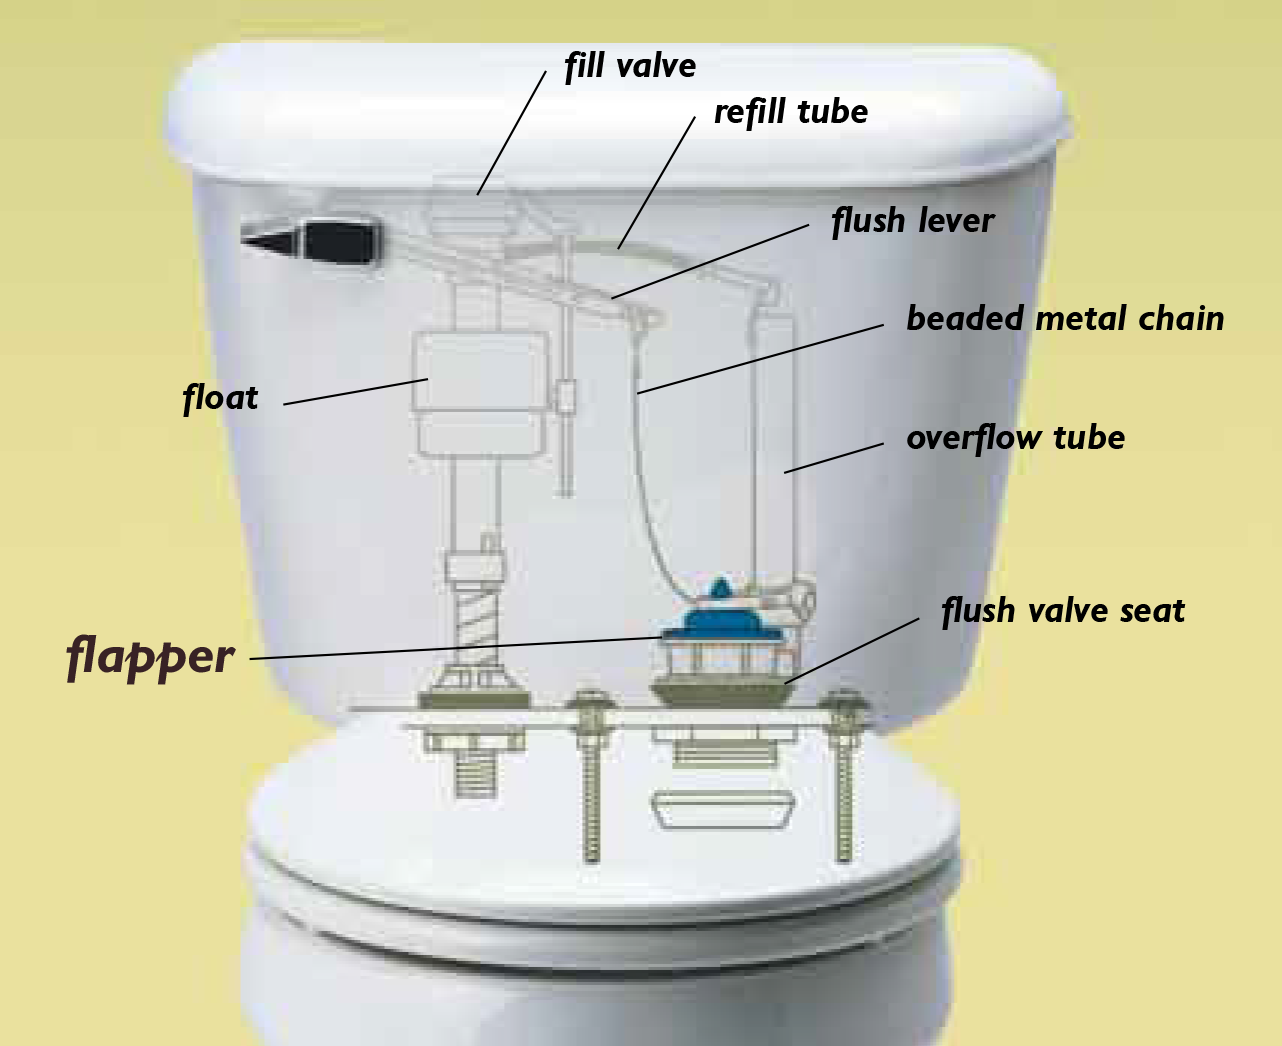
The flapper is the rubber seal at the bottom of the tank. It lifts when you press the handle. Water rushes into the bowl, which makes the flush. Then the flapper falls back to seal the tank.
Over time, rubber hardens or warps. Minerals build up on the valve seat. The chain can kink or be too tight. If the seal is not snug, water drips into the bowl. That slow leak keeps the fill valve cycling.
Knowing how to fix a toilet flapper starts with spotting these wear signs. Once you do, the repair is easy and fast.
/how-to-replace-a-toilet-flapper-2719040-shema-6c3a8e70a8b24f15886a3993cd833d02.jpeg)
Symptoms and quick tests
A bad flapper often shows up in simple ways. Look and listen for these clues before you start work.
- Water runs every few minutes, also known as ghost flushing.
- Tank never seems to stop refilling.
- Jiggle the handle test works for a moment, then leaks return.
- Food coloring test shows dye in the bowl after 10 minutes.
To do the dye test, add a few drops of food color to the tank. Wait 10 minutes without flushing. If color shows in the bowl, you need to learn how to fix a toilet flapper today.

Tools and parts you will need
You do not need much to do this job. Here is a short list.
- New flapper that fits your valve size, often 2-inch or 3-inch.
- Adjustable wrench, only if you also tweak the water supply.
- Scouring pad or non-scratch sponge to clean the seat.
- White vinegar or gentle cleaner for mineral buildup.
- Small bucket or towel for drips.
- Scissors to trim extra chain.
- Optional: new chain or lift wire.
If you are unsure how to fix a toilet flapper on your brand, check the tank stamp. Many tanks list size and model inside. Universal flappers work well, but brand-matched parts often seal best.

Step-by-step: how to fix a toilet flapper
Follow these steps to swap the flapper and stop the leak. This is the core of how to fix a toilet flapper with no stress.
- Turn the shutoff valve clockwise to stop water. It is at the wall under the tank.
- Flush to drain the tank. Hold the handle to empty more water.
- Sponge out the last inch of water near the flapper.
- Unclip the chain from the handle lever.
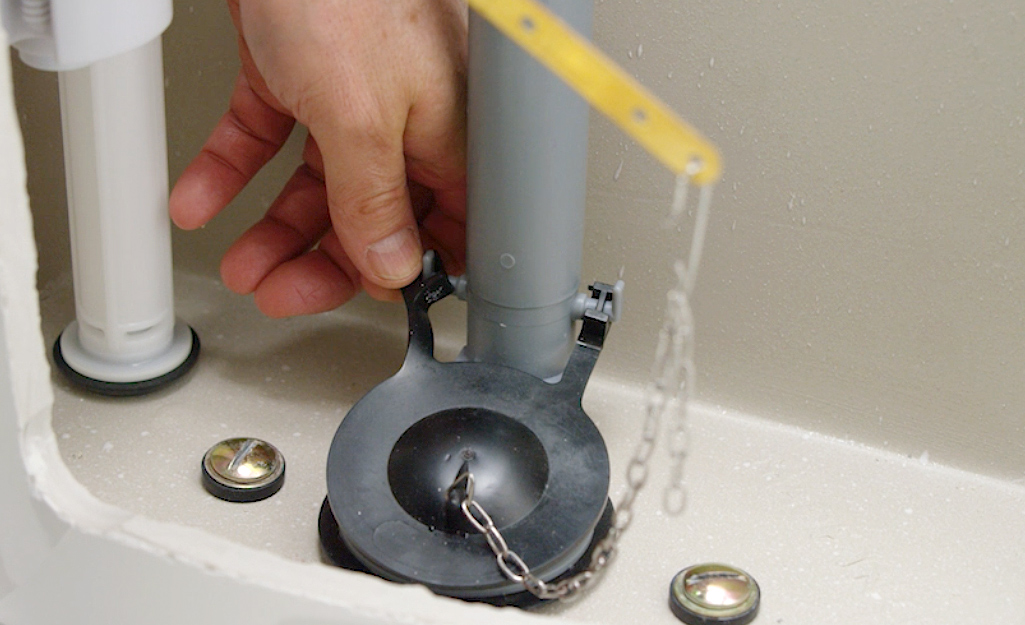
- Remove the old flapper from the overflow tube ears or ring mount.
- Clean the valve seat with a sponge. Remove grit and mineral crust.
- If the seat has a deep groove, install a seat repair ring if needed.
- Fit the new flapper. Clip it to the ears or slide the ring over the tube.
- Attach the chain to the handle lever. Leave about 1 or 2 links of slack.
- Turn the water back on. Let the tank fill.
- Test flush. Make sure the flapper lifts fully and drops clean.
- If the chain is tight, move to a lower hole on the lever. If it is too loose, raise one link.
- Trim extra chain so it cannot snag the flapper.
- Do the dye test again. No color in the bowl means you nailed how to fix a toilet flapper.
This job takes 10 to 20 minutes. Most fixes cost less than a pizza.

Troubleshooting after the swap
If the toilet still acts up, try these quick tweaks. These simple checks often solve the last 10 percent.
- Ghost flushes keep happening. Clean the seat again. Check that the flapper is the right size. Set the water level to the mark on the tank.
- Weak or short flush. Chain may be too tight or too loose. Aim for a small slack, about a quarter inch.
- Flapper stays open too long. Your model may be for 1.6 gpf or 1.28 gpf tanks. Use the right flapper for your flow rate.
- Chain catches under the flapper. Trim the tail. Keep the chain straight above the flapper, not off to the side.
- Refill tube stuck in overflow. Make sure it clips above the tube and does not go down into it.
These small fixes round out how to fix a toilet flapper and get a lasting seal.
:max_bytes(150000):strip_icc()/how-to-replace-a-toilet-flapper-2719040_final2-4c6172f4719a49119836486c9d7c141c.png)
Common mistakes to avoid
A few errors cause most repeat leaks. Avoid these, and you will not need to reopen the tank.
- Over-tight chain that holds the flapper off the seat.
- Using a 2-inch flapper on a 3-inch seat, or the reverse.
- Leaving the seat dirty so the gasket cannot seal.
- Dropping the refill tube into the overflow, which siphons water.
- Using harsh bleach tabs in the tank that crack rubber early.
I learned these the hard way in my first year on the job. Now I check them first on every call about how to fix a toilet flapper.

Picking the right flapper and what it costs
Most toilets use a 2-inch flapper. New high-efficiency models often use 3-inch. To eyeball it, look at the flush valve opening. About tennis ball size is 2-inch. About baseball size is 3-inch.
Standard flappers cost about 5 to 15 dollars. Brand-specific or adjustable models run 15 to 25 dollars. Good parts can save hundreds on water over time. Some studies show a running toilet can waste dozens of gallons per day. That is why learning how to fix a toilet flapper is a smart skill.
If you are not sure, bring the old flapper to the store. Or check the model number inside the tank lid. Staff can match it fast.
:max_bytes(150000):strip_icc()/adjusting-a-toilet-flapper-ball-flush-valve-1824908-hero-ab724b89b3b74f99a5c6eb3140397e19.jpg)
When to call a pro
Sometimes the problem is not the flapper at all. Here is when I tell folks to get help.
- The overflow tube is cracked or loose.
- The valve seat is warped or pitted and needs a repair kit.
- Tank bolts or gasket leak onto the floor.
- You replaced the flapper and fill valve but it still runs.
- Your main shutoff will not close or the supply line drips.
A plumber can diagnose in minutes and will stand behind the work. Still, for most cases, knowing how to fix a toilet flapper is enough.
Simple maintenance to extend flapper life
A bit of care goes a long way. Do these small tasks once a season.
- Wipe the seat and flapper with a soft sponge to remove film.
- Avoid bleach tablets in the tank. They eat rubber and plastic.
- Set water level to the tank mark. Too high can seep past the flapper.
- Test with food dye twice a year. Act fast if you see color in the bowl.
- Keep the chain tidy and straight.
These habits will make your fix last longer. They also cut water use and bills. This is the easy side of how to fix a toilet flapper that many skip.
Frequently Asked Questions of how to fix a toilet flapper
How do I know the flapper is the problem?
Do the dye test. If color moves from the tank to the bowl without a flush, the flapper is leaking.
What size flapper do I need?
Most older toilets use a 2-inch flapper. Many newer high-efficiency toilets use a 3-inch flapper; check the tank stamp or opening size.
How much chain slack should I leave?
Leave a small slack, about one or two links. The flapper should sit flat but lift fully when you press the handle.
Can I use a universal flapper?
Often yes, and many seal well. But brand-specific models can fit better on unique seats, which helps if leaks continue.
How long does a flapper last?
Most last three to five years, less with hard water or bleach tablets. Inspect yearly and replace at the first sign of wear.
Why does my new flapper still leak?
The seat may be dirty or grooved, or the flapper size may be wrong. Clean the seat, adjust chain slack, and confirm you installed the right model.
Will this help lower my water bill?
Yes. A running toilet can waste a lot of water each day. Learning how to fix a toilet flapper can pay for itself in one month.
Conclusion
You now know how to fix a toilet flapper from start to finish. Turn off water, swap the seal, set the chain, and test. With the right part and a clean seat, the leak stops for good.
Take 20 minutes today to do the dye test and make the fix. You will save water, money, and stress. Want more home tips like this? Subscribe, share your success in the comments, or ask a question for your setup.

Table of Contents