Build a sturdy bin storage rack with plywood, 2x4s, screws, and careful measurements.
If you want a clean, strong, and safe way to store gear, this guide is for you. I’ll show you how to build bin storage rack systems that fit your space, hold real weight, and look neat. We’ll cover plans, sizes, tools, steps, and mistakes to avoid. I’ve built many racks for garages, shops, and kids’ rooms. You’ll get the simple path that works the first time.

Plan your project: tools, materials, and measurements
A good bin rack starts with a simple plan. Pick your bins first. Measure them. Then design the frame to fit the bins, not the other way around. This saves space and stops regret later.
Here’s a basic list to build a strong, budget rack:
Tools:
- Tape measure, pencil, square
- Circular saw or miter saw
- Drill/driver with countersink bit
- Stud finder and level
- Safety glasses and hearing protection
- Sander or sanding block
Materials:
- 2×4 studs for uprights, rails, and bracing
- 3/4 in plywood for shelves or runners
- 2-1/2 in construction screws
- 1-1/4 in wood screws for plywood
- Wood glue (optional but strong)
- Angle brackets or Simpson ties (optional)
- Shims, felt pads, and anchors for the wall
Key checks:
- Measure bin width, depth, and height.
- Add at least 1 in clearance in width and height.
- Plan a 2 in finger gap at the front for easy grab.
If you’re new to how to build bin storage rack setups, keep spans short and the design simple. You can always add features later.

Choose a design and size that fits your bins
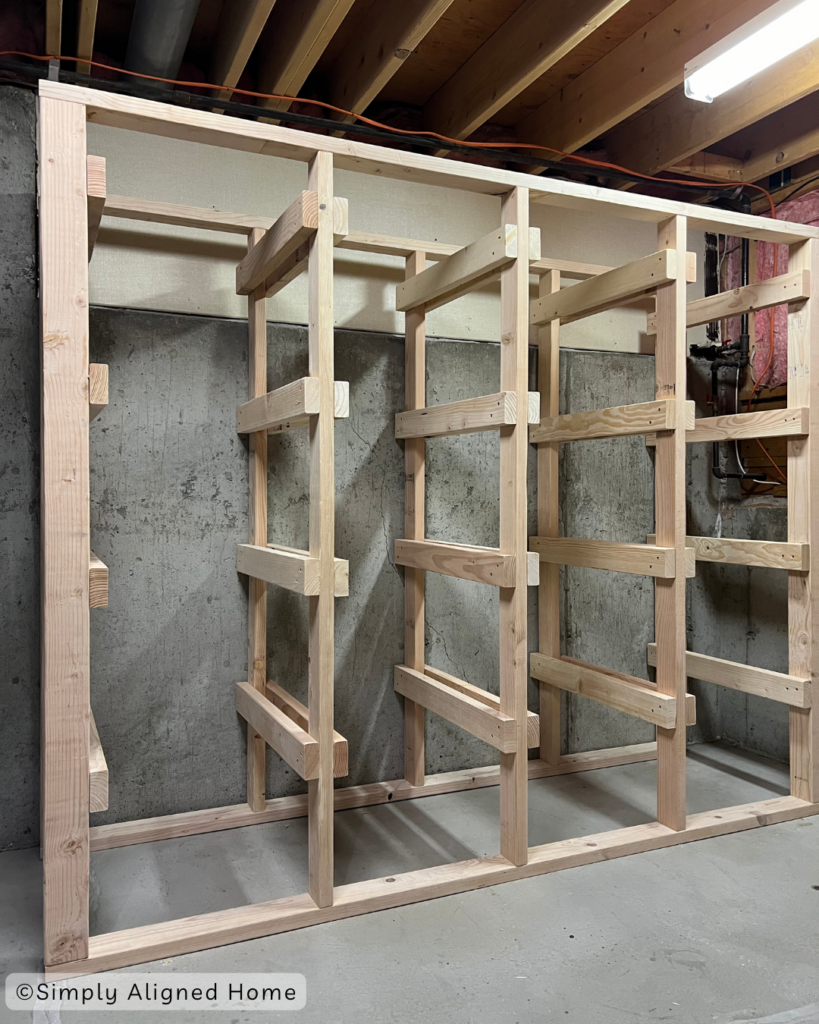
There are two common layouts. Shelf style holds bins on flat decks. Runner style uses two rails under each bin. Shelf style is quick. Runner style saves wood and makes pull-out easier.
Standard sizes that work well:
- Shelf depth: 16 to 24 in for medium bins. 24 in for big totes.
- Space between shelves: bin height plus 1 to 2 in.
- Shelf span: keep under 36 in for 3/4 in plywood to limit sag.
- Aisle space: leave 36 in in front to stand and lift bins.
Pro tip from the field: test-fit one bin bay before cutting all parts. When you learn how to build bin storage rack systems, one mockup can save a pile of wood and time.
Step-by-step: how to build bin storage rack
Here’s how to build bin storage rack units with basic tools. Adjust sizes to match your bins.
Sketch and cut list
Draw a quick front view. Mark shelf count and spacing. Make a cut list with exact lengths.Cut the 2×4 uprights
Cut four uprights to the rack height. Leave 1 to 2 in of air below the bottom shelf for uneven floors.Cut rails and stretchers
Cut pairs of 2x4s for each shelf level. These will support the plywood or act as runners.Mark shelf lines
Mark shelf heights on the uprights. Use a square and make matching marks on all uprights.Build two side frames
Screw rails to uprights to make left and right frames. Use two screws per joint. Check for square.Connect the frames
Stand the side frames up. Tie them with front and back stretchers at the top and bottom. Check for square again.Add shelves or runners
For shelves, cut 3/4 in plywood decks to size. For runners, rip 3/4 in plywood to 3 in wide strips and install a pair per bin row. Pre-drill and screw down.Add back bracing
Add a 2×4 or plywood strip across the back to stop racking. A simple X strap works too.Anchor to the wall
Find studs. Use 3 in screws and washers or brackets to lock the rack to the wall. This is key for tall racks.Sand and ease edges
Knock down sharp edges. Sand the front of shelves for smooth bin pulls.Test with loaded bins
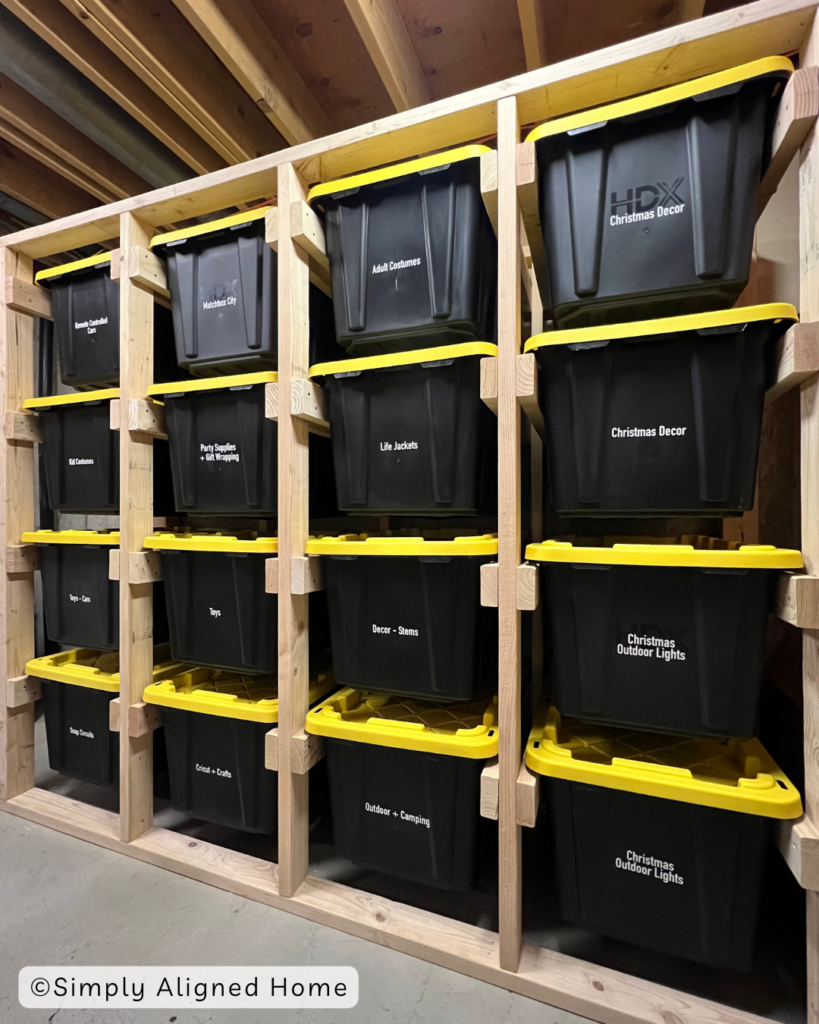
Load the lowest shelf first. Watch for sag or wobble. Fix now, not later.Label each spot
Use a label strip at the front. Map bin zones by category to cut search time.
Safety notes:
- Wear eye and ear protection.
- Keep hands clear of blades.
- Lift with your legs. Heavy bins live low.

Joinery, fasteners, and strength choices
Simple screws work well for most racks. Pocket holes can hide screws on front faces. Glue adds stiffness but makes changes harder. If you plan to move shelves often, use metal shelf standards or cleats.
Good practices I use on job builds:
- Two 2-1/2 in screws at every rail-to-upright joint.
- Pilot holes near board ends to avoid splits.
- Construction adhesive under long shelf decks for less squeak.
- Keep shelf spans short to limit sag. Use center supports on wide bays.
Load sense:
- Heavy bins need support at the front and back.
- Add a center support if shelf width is over 36 in.
- Plywood fronts with a 1×2 lip act like a beam and cut sag a lot.
When you learn how to build bin storage rack that holds serious weight, think like a bridge builder. Short spans. Strong edges. Good anchors.
Finishing, labeling, and workflow
A smooth finish helps bins slide and keeps dust down. Paint or clear coat also seals wood in damp garages. Labels save time and stop the Saturday “where is it?” hunt.
Easy upgrades:
- Sand to 120 grit and wipe clean.
- Roll on two coats of floor paint or water-based poly.
- Add edge band or a 1×2 lip to hide plywood layers.
- Use big, bold labels on the shelf front. Repeat labels on bin tops.
A clean finish makes your how to build bin storage rack project look pro and feel fast in daily use.

Safety, load capacity, and anchoring
Tall racks can tip. Anchor them. Even short racks feel nicer when tied to studs. In quake zones, anchoring is a must. Use lag screws into studs or solid masonry anchors.
Safety tips I teach new DIYers:
- Put heavy bins on the bottom shelf.
- Add diagonal bracing to stop sway.
- Keep clear of outlets and door swings.
- If you add casters, lock them and widen the base.
- Mind local rules for garages with water heaters or cars.
Anchoring is key in how to build bin storage rack setups for kids’ rooms and busy shops. It takes five minutes and adds real peace of mind.
Cost, time, and common mistakes to avoid
Most basic racks cost less than store-bought steel shelves and fit your bins better. Plan on a half day for a small rack and a day for a large one.
Typical costs for a 6 ft tall, 8 ft wide rack:
- 2×4 studs: 10 to 14 pieces
- 3/4 in plywood: 1 to 3 sheets
- Screws, brackets, finish: modest extra
- Total: often under the cost of two big-box metal units
Mistakes I’ve made and fixed:
- Cutting shelves before measuring actual bins. Solution: buy bins first.
- No back bracing, so the rack swayed. Solution: add an X strap or plywood panel.
- Long spans that sag over time. Solution: add a center post or front edge lip.
- Skipping wall anchors. Solution: always tie to studs.
- Using dull blades, which burn and wander. Solution: fresh blade, straight cuts.
If you’re mapping how to build bin storage rack for the first time, mock up one shelf. Load it. Then commit to the full rack. You will save wood and stress.

Maintenance and smart upgrades
Good racks should grow with you. A few small tweaks keep things smooth and safe.
Try these ideas:
- Wipe shelves once a season and check screws.
- Rub paste wax on runners for slick bin slides.
- Add LED strip lights under shelves for dark corners.
- Use French cleats above the rack for tools.
- Swap fixed shelves for cleats if you want height changes later.
These small steps turn how to build bin storage rack into a long-term system, not a one-time project.
Frequently Asked Questions of how to build bin storage rack
What wood should I use for a bin rack?
Use straight 2×4 studs for the frame and 3/4 in plywood for shelves. For light loads, 1/2 in plywood works if spans are short.
How deep should shelves be for common storage bins?
Most medium bins fit 16 to 20 in deep shelves. Big totes often need 24 in, measured at the lid.
How do I stop shelves from sagging?
Keep spans under 36 in, add a center support, or glue a 1×2 lip to the shelf front. Plywood with the long grain front-to-back also helps.
Do I need to anchor the rack to the wall?
Yes, especially for tall or heavy racks. Anchors stop tip hazards and improve feel.
Can I make the shelves adjustable?
Yes. Use cleats with many screw positions or metal shelf standards. Test with a loaded bin before you set all heights.
Should I use nails or screws?
Use screws for stronger joints and easy fixes. Nails can loosen with vibration over time.
What is the best finish for a garage rack?
Floor paint or water-based poly are tough and easy to clean. Avoid thick gloss on runners, as it can get sticky in heat.
Conclusion
A bin rack is a simple build with big daily payoffs. Plan around your bins, keep spans short, brace the back, and anchor the frame. With these steps, you now know how to build bin storage rack systems that fit right, hold strong, and look clean.
Ready to start? Measure your bins, sketch your cut list, and build the first bay today. Share your results, ask questions, or subscribe for more shop-tested plans and tips.

Table of Contents