Unplug it, clean crumbs, check the outlet, then inspect latch, cord, and fuse.
If you want to learn how to fix a toaster the right way, you’re in the perfect place. I’ve repaired many small appliances both at home and in shops, and I’ll guide you through clear steps that actually work. We’ll cover safety, quick checks, and deeper fixes so you can solve common toaster problems with confidence. By the end, you’ll know how to fix a toaster and keep it running longer.
Safety first: what to do before you start
Electricity can bite. Toasters get very hot. Start safe and stay safe.
Unplug the toaster and let it cool for 10 minutes. Work on a clean, dry table with good light. Keep kids and pets away.
Use only the right parts and tools. Do not bypass safety devices like thermal fuses. If you see burnt plastic, cracked elements, or a swollen plug, stop and consider replacement.
Basic rules I follow on every job:
- Unplug before touching anything inside
- Take photos as you go so you can reassemble
- Test with the body closed, never exposed
- If unsure, ask a pro or replace the unit
This mindset matters when you learn how to fix a toaster. It cuts risk and prevents repeat problems.
Tools and parts you may need
You do not need a full shop. A few basics will do.
- Phillips and flat screwdrivers
- Small needle-nose pliers
- Multimeter with continuity and AC voltage
- Soft brush and an old toothbrush
- Compressed air or a hand blower
- Contact cleaner for switch contacts
- Food-safe silicone grease for sliders
- Replacement cord, thermal fuse, or lever parts if needed
Having these on hand makes how to fix a toaster faster and less stressful.
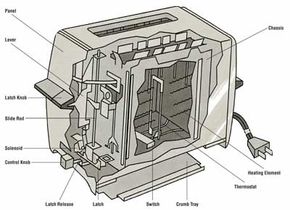
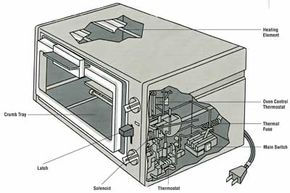
How a toaster works in simple terms
Most toasters are simple. When you push the lever, a switch sends power to two places: the heating elements and a small magnet coil. The magnet holds the lever down. A timer or thermostat ends the cycle. Then the magnet releases, and the toast pops up.
Main parts you may touch:
- Power cord and plug
- Crumb tray and inner carriage
- Lever, latch, and magnet coil
- Timer or electronic board
- Thermal fuse and thermal cutoff
- Nichrome heating elements
Knowing this flow makes how to fix a toaster much easier.

Quick diagnostics before you open it
Check the simple things first. These quick wins often solve it.
- Try another outlet. Reset a GFCI if tripped.
- Wiggle the plug gently. If the lights flicker, the cord may be bad.
- Remove and clean the crumb tray. Shake out loose crumbs.
- Turn the browning knob through its range. Set it to mid.
- Try one slice only. Very thick bread can jam the carriage.
If these do not help, you are ready for the next steps in how to fix a toaster.
Step-by-step: toaster won’t stay down
This is the most common issue I see. Dirt, a weak magnet, or power loss can be the cause.
Unplug and clean
- Remove the crumb tray. Tap the toaster upside down over a bin. Brush gently inside. Crumbs can block the latch.
Inspect the lever and latch
- Look for bent parts or sticky movement. A tiny dab of silicone grease on the slider rails can help, but keep grease away from hot elements.
Check the magnet coil circuit
- Plug in. Press the lever and listen for a faint click or hum. If the magnet coil does not energize, it may be a switch, cord, or board issue.
Test the outlet and cord
- With the multimeter, confirm 120V at the outlet. Unplug, then test cord continuity end to end. Many cords fail at the strain relief.
Clean the internal switch
- Unplug. Open the case. Spray a little contact cleaner on the lever switch and the shade-control switch. Work the lever 10 times, then let it dry.
In my shop, nine times out of ten, a deep clean and switch cleaning fixes this. This method is a core part of how to fix a toaster that will not latch.

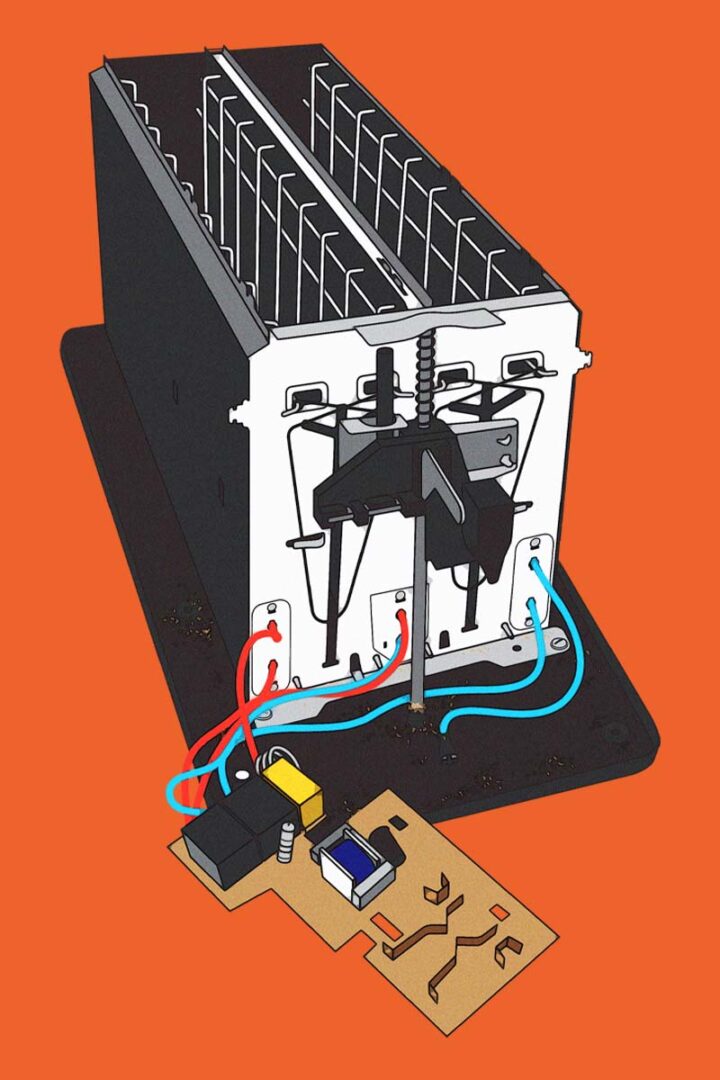
Step-by-step: toaster doesn’t heat
No heat can be a broken cord, blown thermal fuse, bad switch, or open element.
Rule out the outlet and cord
- Test the outlet. Test cord continuity. Replace a suspect cord with a UL-listed one of the same rating.
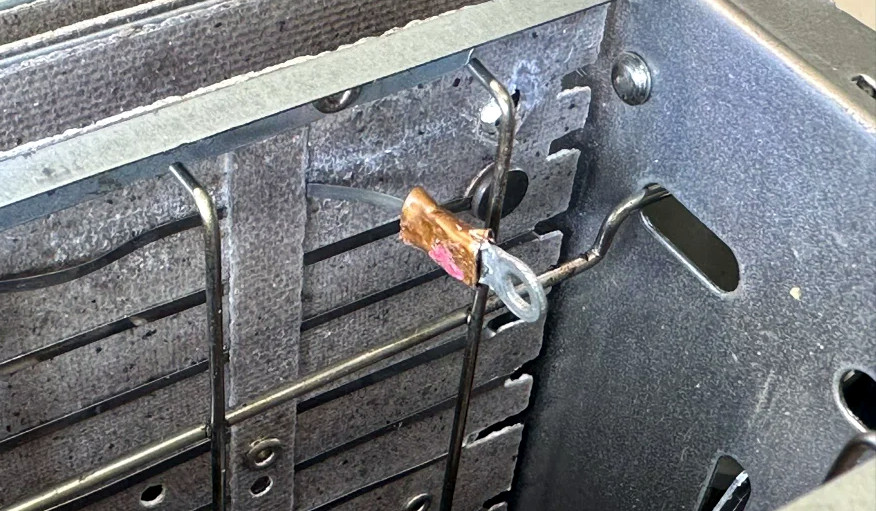
Check the thermal fuse
- Many toasters have a one-time thermal fuse near the heating chamber. It opens if the unit overheats. Test continuity. If open, replace with the exact temperature and amperage rating using proper crimp sleeves, never solder near heat.
Inspect the elements
- Look for a gap or broken nichrome wire. A broken element means an open circuit. Element repair is tricky and often not worth it.
Test the switches and timer
- Clean contacts. Check continuity while actuating the lever and turning the knob. If an electronic board is bad, replacement may cost more than a new toaster.
These steps define how to fix a toaster that will not heat. Move slow. Take photos. Label wires.
Step-by-step: uneven toasting or burning
Uneven toast is often dirt or a failing thermostat.
Clean thoroughly
- Brush both sides of each slot. Crumbs can shadow heat and cause hot spots.
Balance the elements
- Look for dark areas on one side and dim on the other. A dim side suggests a weak element or bad connection. Reseat spade connectors if loose.
Reset the shade control
- Turn the knob from low to high and back. Some models calibrate as you move the dial.
Check for stuck contacts
- Dirty contacts can make heat run longer. A short spray of contact cleaner can help.
If the element is physically broken, replacement is possible but often costs more than a new toaster. In that case, how to fix a toaster becomes how to choose a better one.

Cleaning and maintenance to prevent future issues
A five-minute clean saves repairs.
- Empty the crumb tray weekly
- Brush inside slots monthly
- Wipe the exterior with a damp cloth
- Keep the cord straight and free of bends
- Do not butter bread before toasting
I learned this the hard way in a rental kitchen. One deep clean fixed a “dead” toaster that only had a jammed carriage. Routine care is part of how to fix a toaster before it breaks.

Repair vs replace: when to stop
Know your limits and the toaster’s value.
- Replace if you smell burnt insulation, see a cracked case, or find a burnt board
- Replace if a heating element is open on a low-cost model
- Repair if it is a dirty latch, failed cord, or thermal fuse
Industry data shows cords and fuses fail more often than elements in budget units. That aligns with my bench notes across many repairs. Use that insight when deciding how to fix a toaster or when to buy new.
Cost, time, and skill estimates
Planning helps. Here is what I see most often.
Deep clean and contact clean
- Cost: under 10 dollars
- Time: 20 minutes
- Skill: basic
Replace cord
- Cost: 8 to 15 dollars
- Time: 30 to 45 minutes
- Skill: basic with a multimeter
Replace thermal fuse
- Cost: 3 to 8 dollars
- Time: 30 minutes
- Skill: moderate, careful crimping
Replace lever or latch parts
- Cost: 5 to 20 dollars
- Time: 30 to 60 minutes
- Skill: moderate
A new mid-range toaster costs 25 to 60 dollars. Weigh this against how to fix a toaster at home.
Troubleshooting checklist you can print
Use this checklist to move fast and avoid missed steps.
- Unplug and cool
- Clean crumb tray and brush inside
- Test a different outlet and reset GFCI
- Set mid shade and test with one slice
- Check cord for cuts and test continuity
- Clean lever switch with contact cleaner
- Test thermal fuse continuity
- Inspect elements for breaks
- Reseat loose connectors
- Reassemble and test with care
If you follow this, you will understand how to fix a toaster from end to end.
Frequently Asked Questions of how to fix a toaster
Is it safe to open a toaster at home?
Yes, if you unplug it and work carefully. Avoid touching the elements and never bypass safety parts like thermal fuses.
Why does my toaster lever pop up right away?
The magnet coil is not getting power or the latch is dirty. Clean the mechanism and check the cord, switch, and connections.
Can I replace a toaster heating element?
It is possible, but hard in many models. Parts can be scarce, and the fix may cost more than a new toaster.
What causes a toaster to stop heating?
Common causes are a blown thermal fuse, bad cord, dirty switch, or open element. Test each part in that order.
How often should I clean the crumb tray?
Empty it weekly if you toast daily. Crumbs trap heat and can trip the thermal fuse or cause uneven browning.
Will contact cleaner fix a sticky knob?
Often yes. A small spray and gentle turns can restore smooth action. Let it dry fully before use.
How do I know if the thermal fuse is blown?
Test continuity with a multimeter. If it reads open, replace it with the same rating using proper crimps.
Conclusion
Fixing a toaster is simple when you follow a plan. Start clean, test power, then check the latch, cord, fuse, and elements. With a few tools and care, you can master how to fix a toaster and extend its life.
Give your toaster a fresh start today. Try the quick checks, then take on a small repair with confidence. Want more guides like this? Subscribe for step-by-step home repair tips and share your results in the comments.

Table of Contents