Unplug the lamp, replace cord and socket, match polarity, secure connections, test.
If you want a safe, clean fix that looks new and lasts, you’re in the right place. I’ll walk you through how to rewire table lamp like a pro, with simple steps, real-world tips, and clear safety checks. I’ve rewired dozens of lamps for clients and my own home, and I’ll show you what works, what fails, and how to avoid common mistakes while keeping your lamp true to its style.
Before you begin: safety, scope, and how the job flows
Rewiring a lamp is simple when you slow down and follow the sequence. You will remove the old parts, route a new cord, make tight connections, and test. If you follow this guide, you’ll know exactly how to rewire table lamp from start to finish.
Electricity does not forgive shortcuts. Always unplug before you touch wiring. If you see cracked insulation, burnt parts, or loose metal, replace those parts. When in doubt, pause and ask a qualified pro to look over your setup. This guide uses US standards and parts.
You will also learn how to tell hot from neutral, how to tie an underwriter’s knot, and how to test with a simple multimeter. Those checks are the difference between a quick fix and a safe fix that lasts.

Tools and parts you’ll need
Having the right parts makes how to rewire table lamp faster and safer. Try to use UL-listed parts that match US household voltage.
Tools
- Phillips and flathead screwdrivers
- Wire stripper for 18 AWG lamp cord
- Needle-nose pliers
- Utility knife or flush cutters
- Multimeter with continuity setting
- Electrical tape
- Small adjustable wrench
Parts
- Two-conductor lamp cord set, 18 AWG, SPT-1 or SPT-2, polarized plug
- Replacement lamp socket interior and shell, rated 250V/660W
- Strain relief bushing or underwriter’s knot (or both)
- Rubber grommet for cord exit, if the base has a sharp hole
- Felt pad for the base, if needed
- Optional inline switch or dimmer rated for your bulb type
- Optional three-way socket if you plan to use a 3-way bulb
- Optional green grounding lead and three-prong plug if the lamp has a proper ground path
Tip from experience: SPT-2 has thicker insulation and resists abrasion better. SPT-1 is thinner and easier to route through tight bases. For most indoor table lamps, either is fine if properly secured.
Step-by-step: how to rewire a table lamp
Follow these steps in order. This is the clean, repeatable way I use when clients ask how to rewire table lamp and want a tidy finish.
- Unplug and prep
- Unplug the lamp.
- Take a few photos so you remember how parts stack.
- Remove the bulb and shade. Set them aside.
- Open the socket
- Press the metal shell at the “press” points and pull the shell straight up.
- Slide off the cardboard or plastic insulator if present.
- You should see two terminal screws on the socket interior.
- Remove the old cord
- Loosen the two screws. Note which wire went to silver and which to brass.
- Untie the underwriter’s knot if present.
- Pull the old cord back through the body and base.
- Prepare the new cord
- Feed the new cord up through the base and body to the socket cup.
- Use a grommet or strain relief where the cord exits metal.
- Tie an underwriter’s knot near the socket to relieve strain.
- Identify hot and neutral
– The neutral conductor has ribbed insulation. The hot is smooth.
- Neutral goes to the silver screw. Hot goes to the brass screw.
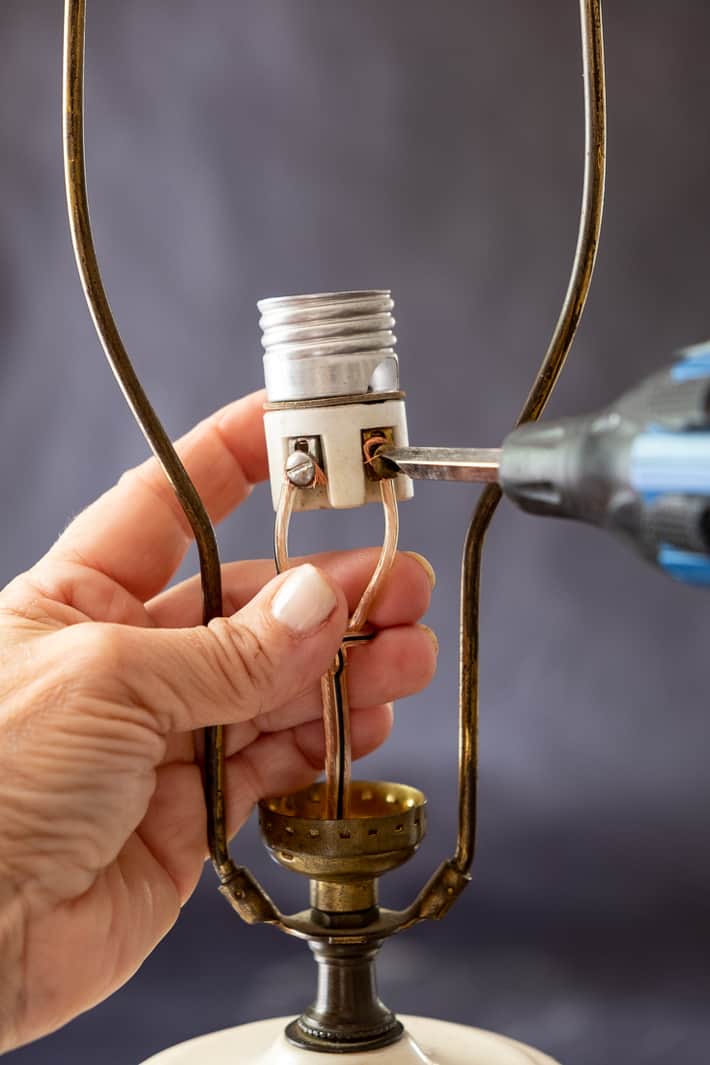
- Make solid connections
- Strip about 1/2 inch of insulation. Twist each end.
- Hook the neutral under the silver screw, hot under the brass screw.
- Tighten firmly so the wire does not wiggle. No bare copper should show.
- Reassemble the socket
- Slide the insulator back on.
- Snap the shell down until it clicks and does not rotate.
- Tug the cord gently; the knot or strain relief should hold, not the screws.
- Secure the base
- Add felt or a pad so the cord is not pinched under the base.
- Make sure the lamp stands flat and does not rock.
- Test with a multimeter
- Unplugged, check continuity from plug blade to the socket screws:
- Wide blade to silver screw should beep.
- Narrow blade to brass screw should beep.
- Check there is no continuity from either blade to the metal shell of the socket.
- Power up and verify
- Install a known-good bulb.
- Plug in and turn the switch. The bulb should light without flicker or buzz.
- If anything seems off, unplug and recheck connections.
Common rookie mistakes I see when people try how to rewire table lamp:
- Reversing hot and neutral. That can energize the shell and shock you.
- Forgetting strain relief. The cord pulls loose over time.
- Using a cracked socket shell. Replace it rather than risk a short.

Wiring basics made easy
Think of power like a loop. Hot brings power to the lamp. Neutral carries it back. The ground is a safety path if metal parts become energized.
- Hot wire: smooth insulation on the cord. Connects to brass screw. Small slot side of the receptacle.
- Neutral wire: ribbed insulation. Connects to silver screw. Wide blade on the plug.
- Ground wire: green or bare copper. On a table lamp, you only use it if the lamp has a designed ground path and a 3-prong plug.
If you ever feel lost on how to rewire table lamp, touch the cord. The ribbed side is neutral. Match neutral to silver. Match hot to brass. Keep that simple rule, and most problems vanish.
:max_bytes(150000):strip_icc()/how-to-rewire-a-lamp-5075744-05-832538947a324a49b2bf99bac7c46fa9.jpg)
Special cases and smart upgrades
Some lamps ask for extra steps. Here is what to know before you change parts.
3-way sockets
- A 3-way socket still uses only hot and neutral from the cord.
- The extra contacts are inside the socket and manage the two filaments in a 3-way bulb.
- When you do how to rewire table lamp with a 3-way, the wiring at the screws stays the same.
Metal-bodied lamps and grounding
- Many table lamps are double-insulated and use two-prong cords.
- If the lamp has a true ground path from the socket cup to the base, you can add a green ground lead to the socket’s green screw and use a 3-prong plug.
- If there is no continuous path, do not fake a ground. Use a proper two-wire setup.
Inline switches and dimmers
- Cut the hot conductor only, and wire the switch inline per its diagram.
- Use dimmers only with bulbs they support. Many LED bulbs need “LED-compatible” dimmers.
Old or imported lamps
- European lamps use different plugs and colors. Brown is hot, blue is neutral, green/yellow is ground.
- If you adapt one for US use, replace the cord and socket with US-rated parts rather than using a travel adapter.
Antique or valuable pieces
- If the lamp has collectible value, preserve the original look.
- You can keep the outer shell and replace only the interior socket and cord for a safe, invisible upgrade.
These tips keep how to rewire table lamp straightforward, even when the lamp is not standard.

Troubleshooting and testing
If it does not light, do not guess. Use a simple plan to find the fault.
No light at all
- Test with a known-good bulb first.
- Check continuity from plug to socket screws. If no beep, a knot or splice may be loose.
Flicker or buzz
- Tighten the bulb and the socket shell. Loose parts cause arcing and noise.
- Replace a worn switch or socket interior. They wear out and cause flicker.
Breaker trips or you feel a tingle
- Unplug at once.
- Check that hot and neutral are not touching and that no strand is bridging screws.
- Confirm hot is on brass, neutral on silver. This is the core of how to rewire table lamp safely.
Heat or smell
- Use a bulb within the socket rating. Many sockets are 60W max for incandescent.
- With LEDs, match the equivalent light, not the watt rating printed for incandescent.

Time, cost, and when to call a pro
How to rewire table lamp usually takes 30 to 60 minutes once you have parts. Expect a little more time for antiques or tight bases.
Typical costs
- Cord set: 8 to 15 dollars
- Socket interior and shell: 5 to 12 dollars
- Inline switch or dimmer: 7 to 25 dollars
- Basic multimeter: 15 to 30 dollars
Call a pro if
- The lamp has damaged metal, unusual internals, or asbestos insulation.
- You need a new hole or bushing drilled in a fragile base.
- You cannot confirm polarity with a multimeter.
I have had cases where a client asked how to rewire table lamp and the base crumbled when opened. In those cases, a restorer saved the piece and we wired it after the repair. It is fine to tap the brakes and get help.
:max_bytes(150000):strip_icc()/how-to-rewire-a-lamp-5075744-hero-870a84c93e524918b03b0c15b9d3c6cb.jpg)
Maintenance and safety tips after rewiring
A safe lamp today should be a safe lamp a year from now. A little care goes a long way.
- Keep the cord free of pinch points under furniture.
- Dust the socket and switch so grit does not cause wear.
- Check the felt base yearly. Replace if the cord rubs through.
- Use bulbs that match the socket rating. For LEDs, pick quality brands that are dimmer-safe if you use a dimmer.
If you ever loan your lamp for a move or a stage, label it with the wattage limit. It prevents someone from popping in a 150W bulb and cooking the socket. This small habit supports every step you took when you learned how to rewire table lamp.

Frequently Asked Questions of how to rewire table lamp
How do I tell hot and neutral on a lamp cord?
Feel the insulation. The neutral side is ribbed, and it goes to the silver screw. The smooth side is hot, and it goes to the brass screw.
Do I need a ground wire for a table lamp?
Most table lamps use a two-prong cord and do not need a ground. If the lamp has a designed ground path, you can add a ground, but do not improvise one.
What size wire should I use for rewiring?
Use 18 AWG SPT-1 or SPT-2 lamp cord rated for 300V. Both are standard for table lamps and are easy to route and strip.
Can I add an inline switch or dimmer?
Yes. Cut the hot conductor only and wire the switch per the diagram. Use dimmers that support your bulb type, especially for LEDs.
Why does my lamp still flicker after rewiring?
The socket or bulb may be worn, or the bulb may be incompatible with a dimmer. Replace the socket interior or use a different bulb to test.
Is it okay to reuse the old socket shell?
Yes, if the shell is intact and not cracked. Always replace a brittle or scorched shell to avoid shorts.
How long does a rewired lamp last?
With quality parts and good strain relief, many years. Check the cord and felt yearly, and replace parts at the first sign of wear.
Conclusion
You now have a clear path to a safe, reliable fix. You learned how to rewire table lamp step by step, how to match hot and neutral, how to secure the cord, and how to test your work with simple checks. That process gives you light you can trust and a lamp you can love for years.
Take the next step today. Pick a lamp, gather the parts, and put this guide to work. If this helped, subscribe for more hands-on home fixes or drop a question so I can help with your exact lamp.

Table of Contents