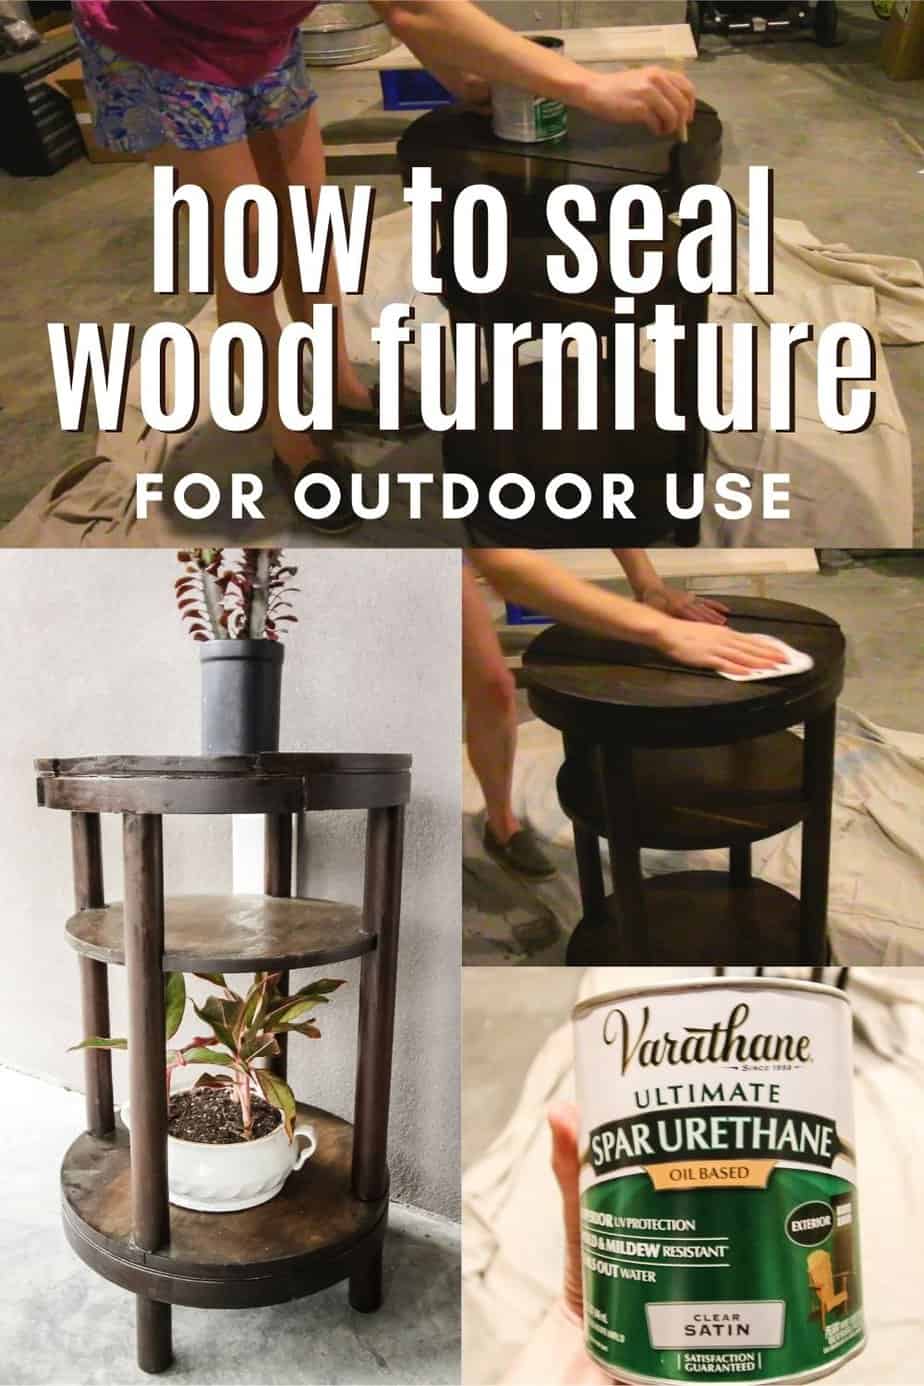
Use spar urethane or marine varnish after sanding, cleaning, and sealing end grain.
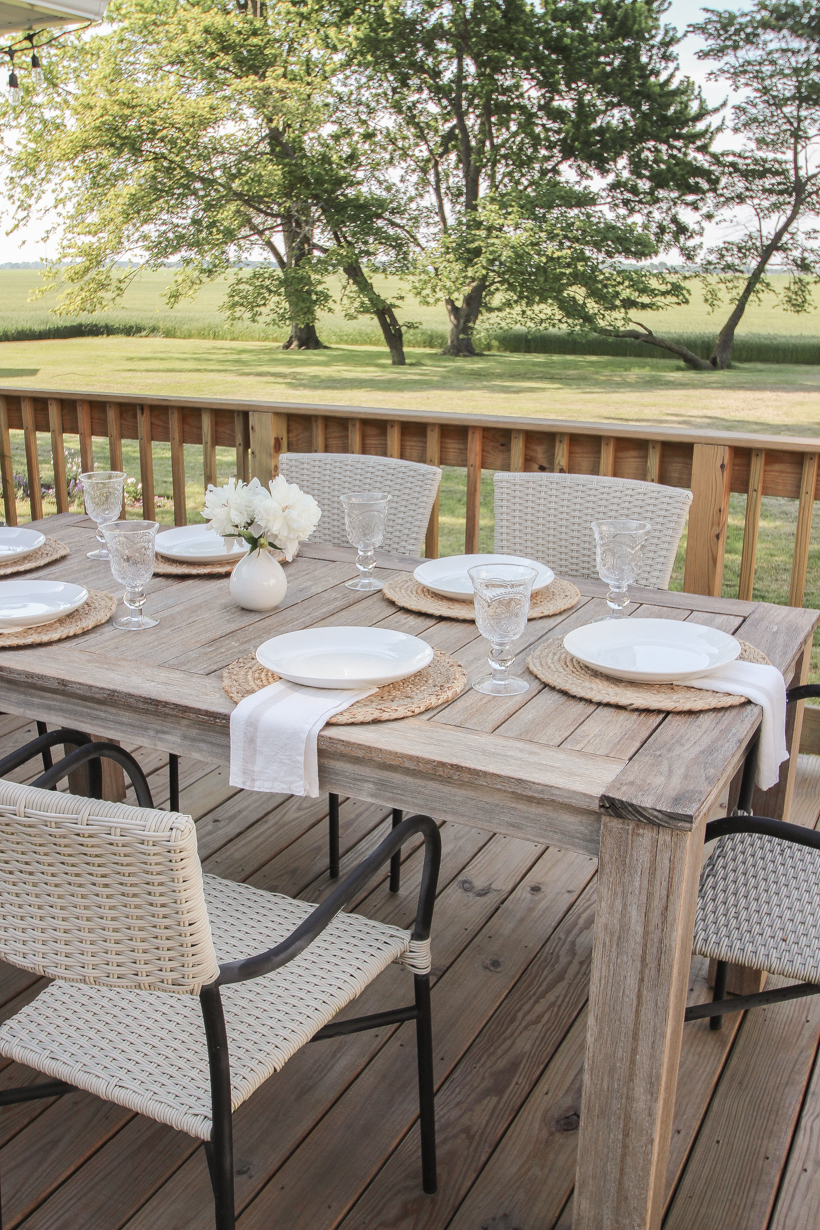
If you want a wood table to survive sun, rain, and temperature swings, you need more than a quick coat of stain. In this guide on how to seal wood table for outdoor use, I’ll show you the exact steps I use on client pieces and my own patio tables. We will cover the right products, the right prep, and the right maintenance so your table stays beautiful season after season.
What you need before you start
Gather everything first. It keeps the process smooth and clean.
- Protective gear. Nitrile gloves, safety glasses, and a respirator rated for organic vapor.
- Cleaning supplies. Mild soap, water, white vinegar, and a stiff nylon brush.
- Prep tools. Drop cloths, painter’s tape, sanding block, tack cloths.
- Abrasives. Sandpaper grits 80, 120, 150, and 220.
- Fillers and epoxy. Exterior wood filler and a two-part penetrating epoxy for end grain.
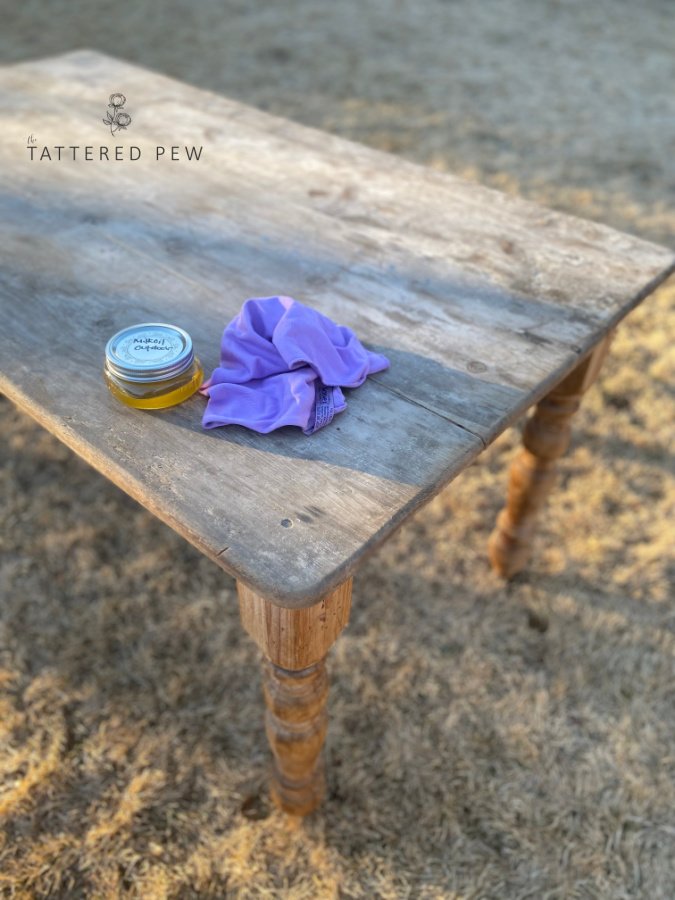
- Sealers. Spar urethane or marine varnish, or a penetrating oil like tung oil. You can also use a thin epoxy seal coat under varnish for heavy weather.
- Brushes and applicators. Natural bristle for oil-based varnish, foam brushes, lint-free rags.
- Optional sprayer. For large tables, an HVLP sprayer speeds things up.
I use high-quality marine finishes on tabletops that see full sun. For covered patios, a durable exterior polyurethane works well and costs less.
Choosing the right sealer for outdoors
Picking the finish is half the battle in how to seal wood table for outdoor use. Think about sun, water, and movement.
- Spar urethane or marine varnish. Great UV blockers. Flexible film that moves with wood. Best for heavy sun and rain.
- Exterior polyurethane. Strong and clear. Many versions resist yellowing. Good for covered or partial sun areas.
- Penetrating oils (tung or teak blends). Easy to apply and refresh. Lower build and gloss. Needs more frequent upkeep.
- Epoxy undercoat plus varnish. Top protection for tabletops in harsh weather. Epoxy seals end grain. Varnish adds UV defense over epoxy.
A simple rule I use: if the table sits in open sun and rain, use a marine-grade approach. If it sits under a roof, a high-quality exterior poly or an oil finish is enough.

Prep the wood the right way
Good prep makes any approach to how to seal wood table for outdoor use last longer.
- Inspect the wood. Look for gray fibers, mold, loose joints, and raised grain.
- Clean well. Wash with mild soap and water. Add a bit of vinegar for mildew. Let it dry 24 hours.
- Sand in steps. Start at 80 grit to level old finish. Move to 120, 150, then 220 for a smooth surface.
- Open the pores. Wipe with a damp cloth to raise grain. Lightly sand at 220 again.
- Seal the end grain. Brush on a thin epoxy or extra coats of sealer. End grain drinks water first.
- Tape what you must. Protect metal hardware or areas you do not want to coat.
I once skipped end-grain sealing on a pine picnic table. The edges swelled after the first storm. Since then, I always pre-seal edges and underside before the final coats.
Step-by-step: how to seal wood table for outdoor use
Follow these steps to get a durable, even finish.
- Set the right conditions
- Work at 50–85°F with humidity under 65 percent.
- Avoid windy, dusty spaces and direct sun while coating.
- Dust control
- Vacuum the table and the work area.
- Wipe with a tack cloth so you start clean.
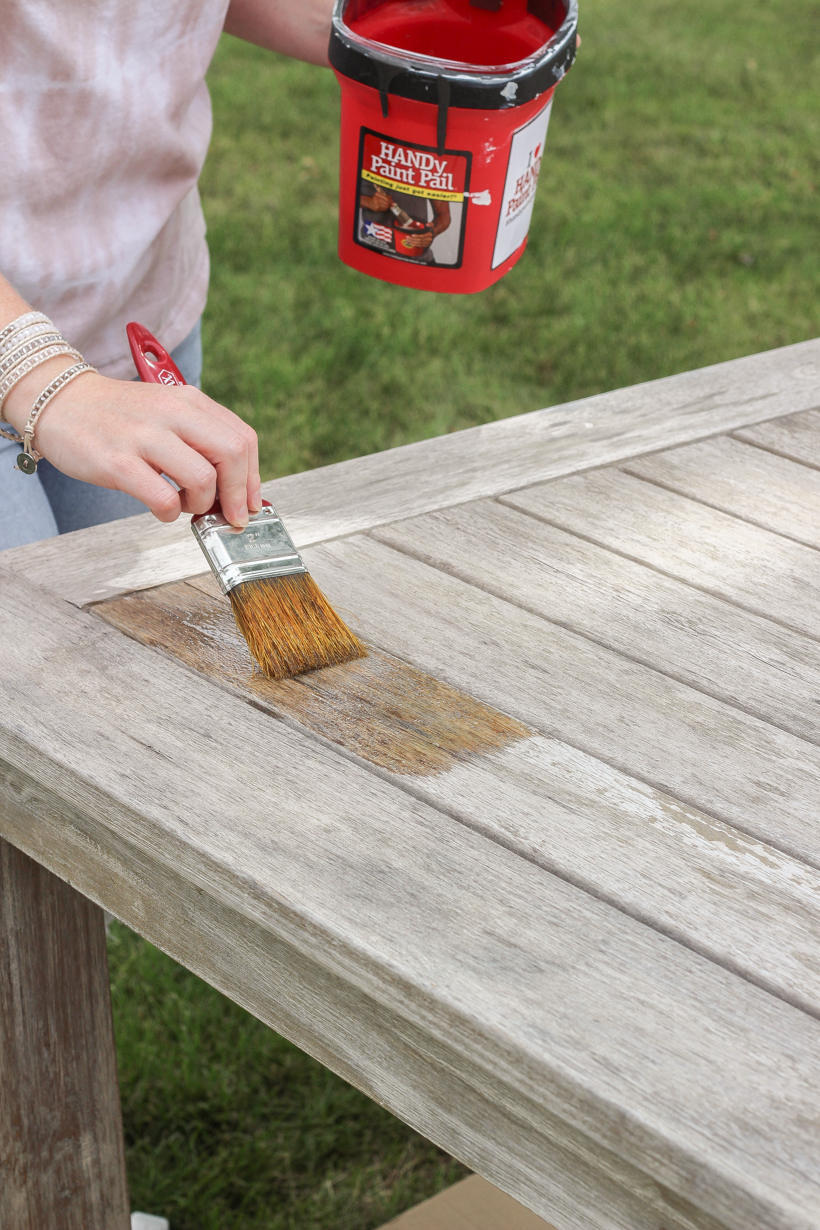
- First sealing coat
- For film finishes, thin the first coat about 10 percent if allowed.
- Brush with the grain in long, even strokes.
- Coat the underside first, then flip and coat the top.
- Let dry per the product label.
- Sand between coats
- Use 220–320 grit to knock down dust nibs.
- Wipe clean with a tack cloth.
- Build coats
- Apply 2–4 more thin coats of spar urethane or varnish.
- If you used epoxy as a base, add 2–3 coats of UV-protective varnish on top.
- Rotate the table to reach edges, legs, and undersides.
- Pay extra attention to table ends and joints.
- Curing time
- Air-dry is not the same as cure.
- Most film finishes need 3–7 days before heavy use.
- Do not cover the table while the finish cures.
- Final touch
- Lightly buff with a brown paper bag or extra-fine pad to remove minor dust.
- Add felt or rubber feet so the legs stay off wet ground.
This workflow for how to seal wood table for outdoor use gives a smooth, strong finish that resists sun and water.

Product choices by wood type
Different woods need different plans in how to seal wood table for outdoor use.
- Teak, ipe, and acacia. Dense and oily. Wipe with acetone before finishing. Use a penetrating oil or marine varnish designed for oily woods.
- Cedar and redwood. Soft but rot-resistant. Use spar urethane for UV and a warm look.
- Pine and fir. Soft and thirsty. Seal end grain with epoxy or extra coats.
- Oak. Open grain. Fill pores if you want a glass-smooth top. Then use varnish.
I keep a small offcut from each table to test finish blends. It saves me surprises.
Pro tips, lessons learned, and time-savers
Here are field-tested tips that make how to seal wood table for outdoor use easier.
- Thin coats win. Thick coats trap solvents and can wrinkle.
- Stir, don’t shake. Shaking adds bubbles you will then sand out.
- Watch the edges. Give edges an extra pass each coat. Water hangs there.
- Seal hardware holes. A quick swab inside screw holes prevents water wicking.
- Mind the underside. The bottom needs full protection like the top.
- Shade your work. Direct sun flashes solvents and ruins flow.
- Maintain a wet edge. Start at one corner and move across with the grain.
My biggest mistake early on was rushing cure time. The table felt dry after a day, but coasters still left rings. Give it the time the label asks for.

Maintenance and care schedule
Even the best plan for how to seal wood table for outdoor use needs upkeep.
- Weekly or biweekly. Wipe dust and pollen with a damp cloth.
- Monthly in season. Wash with mild soap and water. Avoid harsh cleaners.
- Each spring. Light scuff with 320 grit and add a refresher coat if the gloss drops.
- After storms. Dry the table. Avoid trapping moisture with covers.
- Every 12–24 months. Recoat film finishes before you see bare wood. Oil finishes may need more frequent touch-ups.
If you maintain before failure, you will avoid a full strip and refinish.
:max_bytes(150000):strip_icc()/how-to-seal-painted-wood-for-the-outdoors-5214910-hero-02-0dd1602cb80e4b33a09b10e15ebc1c7d.jpg)
Common mistakes to avoid
Skip these traps in how to seal wood table for outdoor use.
- Skipping surface prep. Dirt and mildew break adhesion.
- Coating wet wood. Moisture under the film causes peeling.
- Ignoring end grain and underside. Water will find the weak spot.
- Applying in high humidity. Blush and clouding can form.
- Using interior polyurethane outside. It lacks UV and flexibility.
- Covering too soon. Trapped vapors leave a tacky mess.
Safety and environmental notes
Keep your shop and yard safe while you seal.
- Ventilation. Use a respirator and move air through the workspace.
- Rags. Dry oil-soaked rags flat or store in a sealed metal can. They can self-ignite.
- Disposal. Follow local rules for solvents and leftover finish.
- Low-VOC options. Water-based exterior polys are safer indoors and dry fast.
- Skin contact. Wear gloves. Many finishes can irritate skin.
Troubleshooting and quick fixes
Even a careful plan for how to seal wood table for outdoor use can hit snags.
- Bubbles in the finish. Sand smooth at 320 and recoat with thinner layers. Work slower.
- Dust nibs. Let dry, scuff lightly, and wipe with a tack cloth before recoating.
- Milky or cloudy look. High humidity is likely. Wait for a drier day and recoat.
- Peeling edges. Sand back to sound finish, reseal end grain, and build thin coats.
- Water rings on oil finishes. Rub with a bit of oil and 0000 steel wool, then re-oil.
Frequently Asked Questions of how to seal wood table for outdoor use
What is the best finish for full sun and rain?
Spar urethane or marine varnish is the best choice. It has UV blockers and stays flexible as the wood moves.
Can I use interior polyurethane outside?
No. Interior poly lacks UV protection and cracks outdoors. Use exterior polyurethane, spar urethane, or marine varnish instead.
How many coats do I need on a tabletop?
Aim for 3–5 thin coats. More thin coats beat fewer thick ones and last longer.
How long should I wait before using the table?
Most finishes need 3–7 days to cure for regular use. Light handling after 24–48 hours is okay, but avoid heavy loads and covers.
Do I need to seal the underside and end grain?
Yes. Water enters from the weakest point. Seal the underside and soak the end grain with extra finish or a thin epoxy.
Is oil finish enough for outdoors?
It can be, if you accept more maintenance. Oils are easy to refresh but need frequent reapplication.
Can I put a cover on the table?
Only after full cure. Use a breathable cover and allow airflow to prevent trapped moisture.
Conclusion
Sealing a wood table for the outdoors comes down to solid prep, smart product choice, and patient application. When you follow these steps for how to seal wood table for outdoor use, your table will stand up to sun, rain, and daily life. Keep a simple maintenance routine, and you will avoid major repairs later.
Ready to protect your table? Pick your finish, set up your workspace, and start with the first thin coat today. If you found this helpful, subscribe for more practical woodworking guides or share your own results in the comments.

Table of Contents